


Message brokers are a powerful inter-service communication tool when building a distributed application. Rather than forcing every service to communicate synchronously, likely through HTTP requests, message brokers let us decouple the services from each other and communicate asynchronously instead. This can make our application more fault-tolerant, because if one service fails, the entire request will not necessarily fail, and more performant, because our producer can immediately continue executing after it sends a message off to the broker.
One of the most popular open-source message brokers is RabbitMQ. This blog is designed to demonstrate the very basics of RabbitMQ’s functionality in Node, and to show how you can convert a potentially synchronous process using the tool. The code for this post is online for download from my S3 bucket.
This tutorial leans heavily on Ashley Davis’ book “Bootstrapping Microservices” which I’d highly recommend getting if you are interested in distributed applications.
How does RabbitMQ work?
At it’s core, RabbitMQ allows you to decouple your services from one another by providing an abstract API through which they can all communicate. There’s an excellent overview of RabbitMQ on this Youtube video from Whitney Lee at IBM, where she compares it to a post office: messages come into the broker from producers on the one side, and head out to queues on the other side, based on the “address” provided by the producer. The consumer microservices then pull messages out of those queues and process them, when they’re able to.
This architecture means that the producers don’t know which consumers are going to read their messages, and the consumers don’t know which producers are creating them. The simplest way that we can transmit a message through this system is known as a “direct exchange.” Here’s a diagram of the data flow.
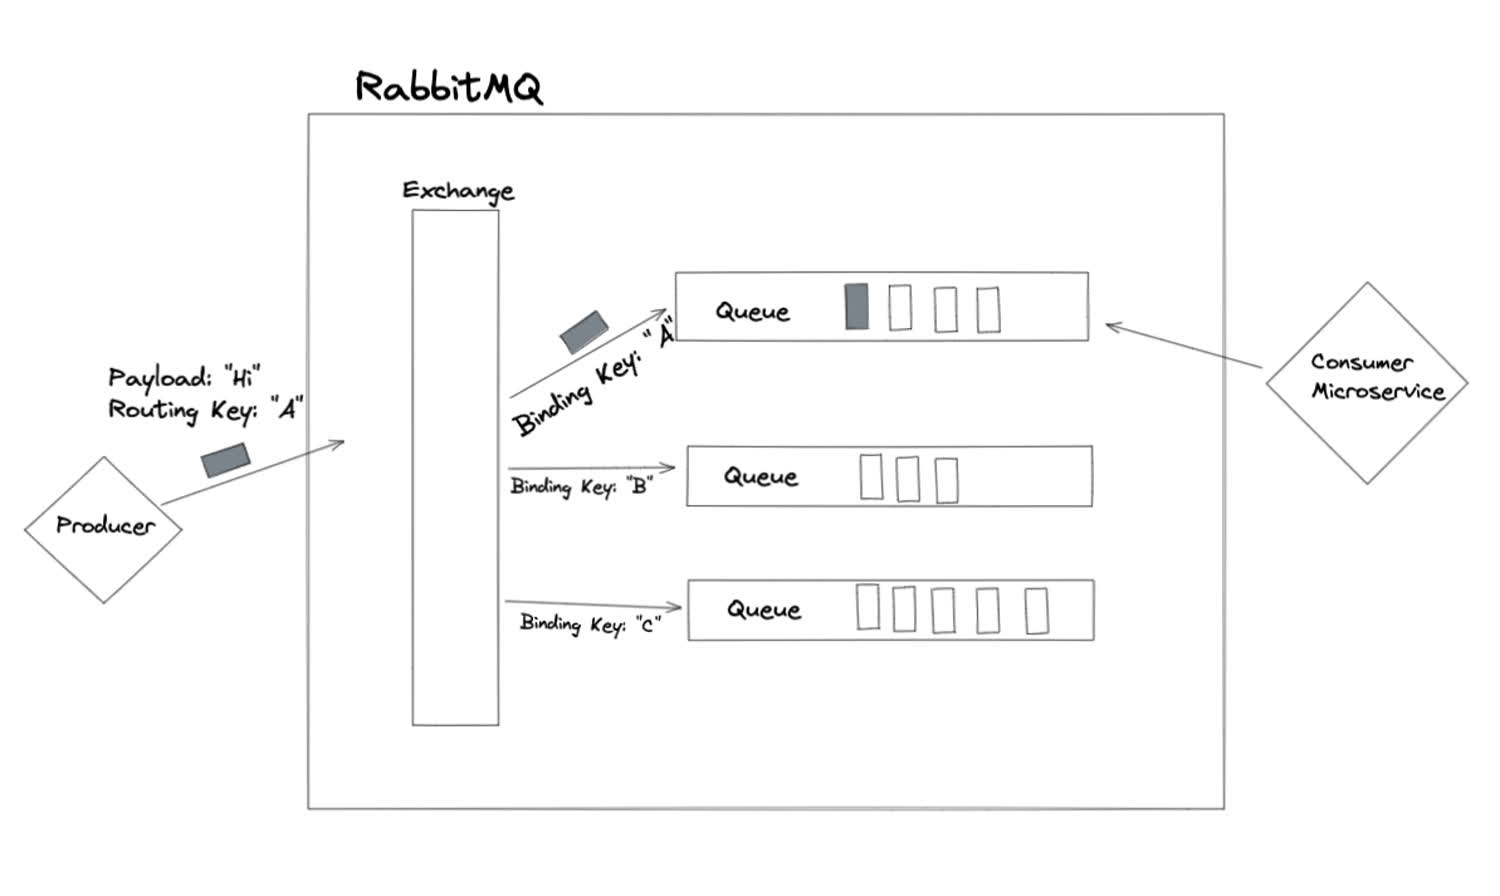
This is how RabbitMQ’s “direct exchange” works.
First, the producer microservice creates a message and publishes it to the exchange. The message contains both the payload (RabbitMQ uses binary by default) and the “routing key” of the message. The type of exchange that this message is published to is a “direct exchange,” which means that the message will be sent to a single queue, where the binding key of the queue matches the routing key of the message.
Think of the routing key like an address on an envelope, and the binding key like the address on a house: The exchange will read the routing key on the message and send our message to the house (queue) with the same address.
Once the message is sent to the correct queue, the consumer can consume it.
Different kinds of exchanges
The above example is the simplest to understand, but it’s not the only kind of communication routing RabbitMQ knows how to perform. The way the message is routed through the system, in fact, is only partly determined by the routing key encoded in the message. The routing is also controlled by the type of exchange used. Another very common exchange type is a “fanout” exchange. In this case, the routing key is ignored, and the message is routed to all of the queues that are bound to it.
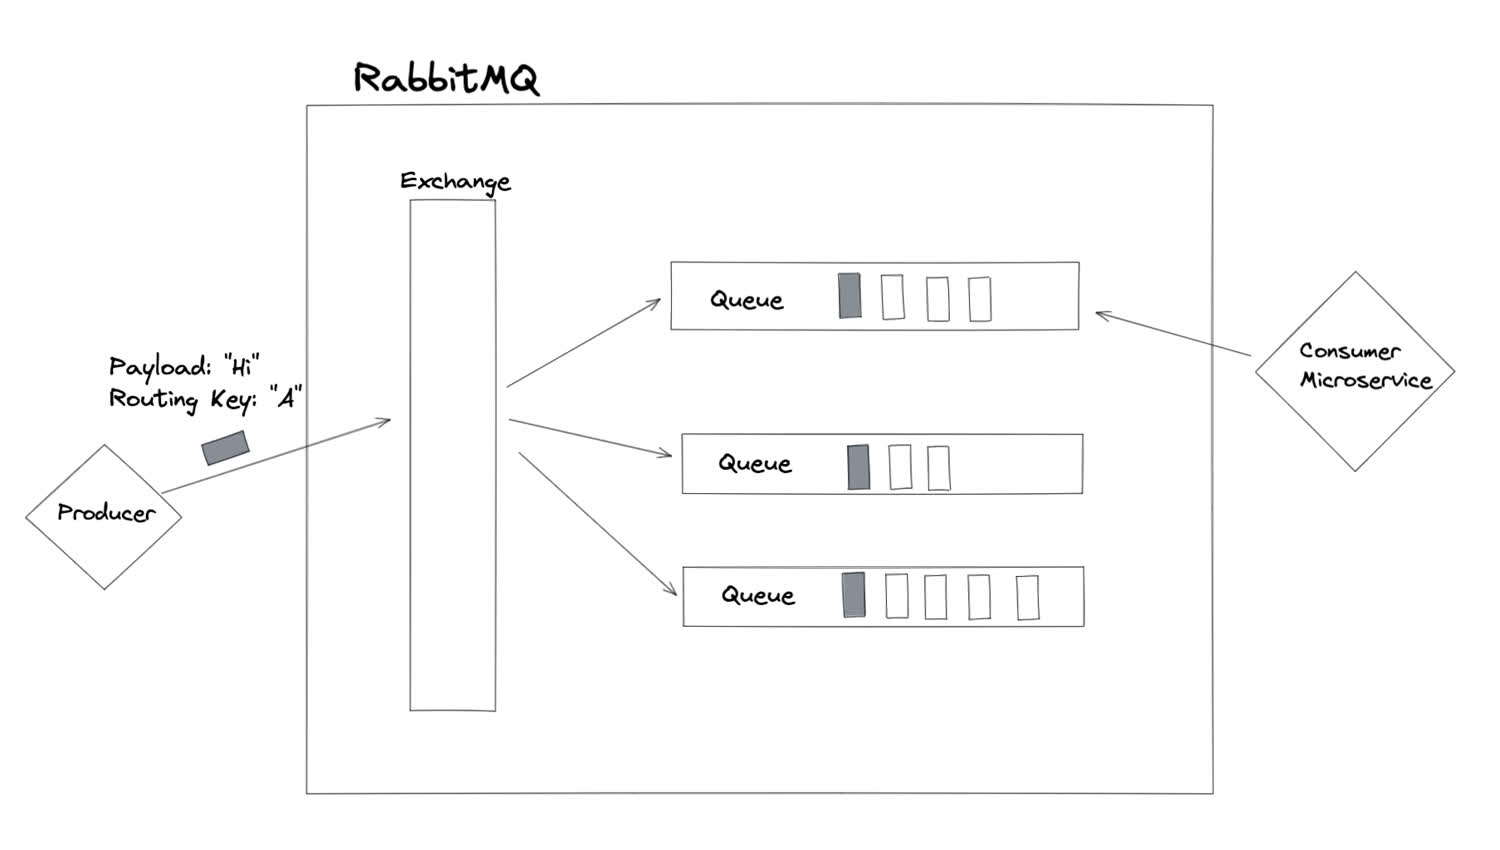
The “fanout” routing strategy sends a message to every bound queue.
This is basically the pub/sub model.
There are a few other types of exchanges, but other one we’ll cover is the topic exchange. If the direct exchange is the most “precise” form of routing, and the fanout is the least precise, the topic exchange is somewhere in the middle—messages are routed to queues whose binding key partially matches the routing key of the message.
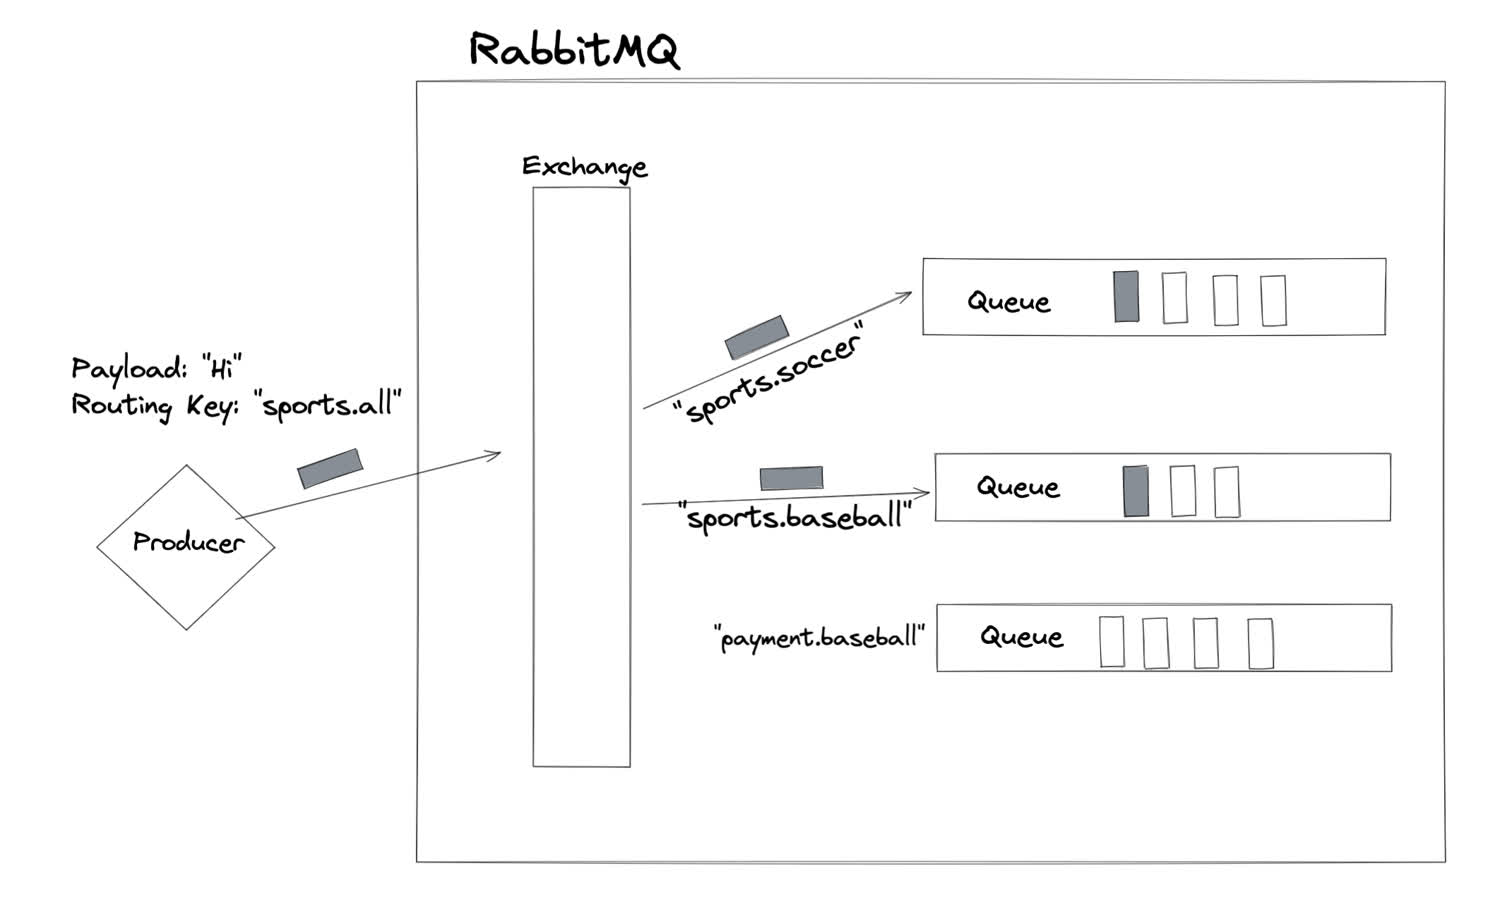
The topic exchange sends a message to every queue whose binding key partly matches the routing key.
In the preceding exmple, the message was forwarded to two different queues, whose binding keys partially matched the routing key of the message. The message was not sent to the third queue because its binding key did not match, even partly.
Starting up RabbitMQ with Docker
The easiest way to get up and running with RabbitMQ is to run it inside of a container. We can easily run a dockerized version of the messaging queue on our local machine.
$ docker run -dit -p 15672:15672 rabbitmq:3.8.1-managementThe “management” portion of the image we are using will create a management dashboard that will let us see the container in action. The dashboard will run on port 15672 inside of the container, which we are binding to the host machine so that we can access it. If you go to http://localhost:15672 on your local machine, you should now be able to access the management console.
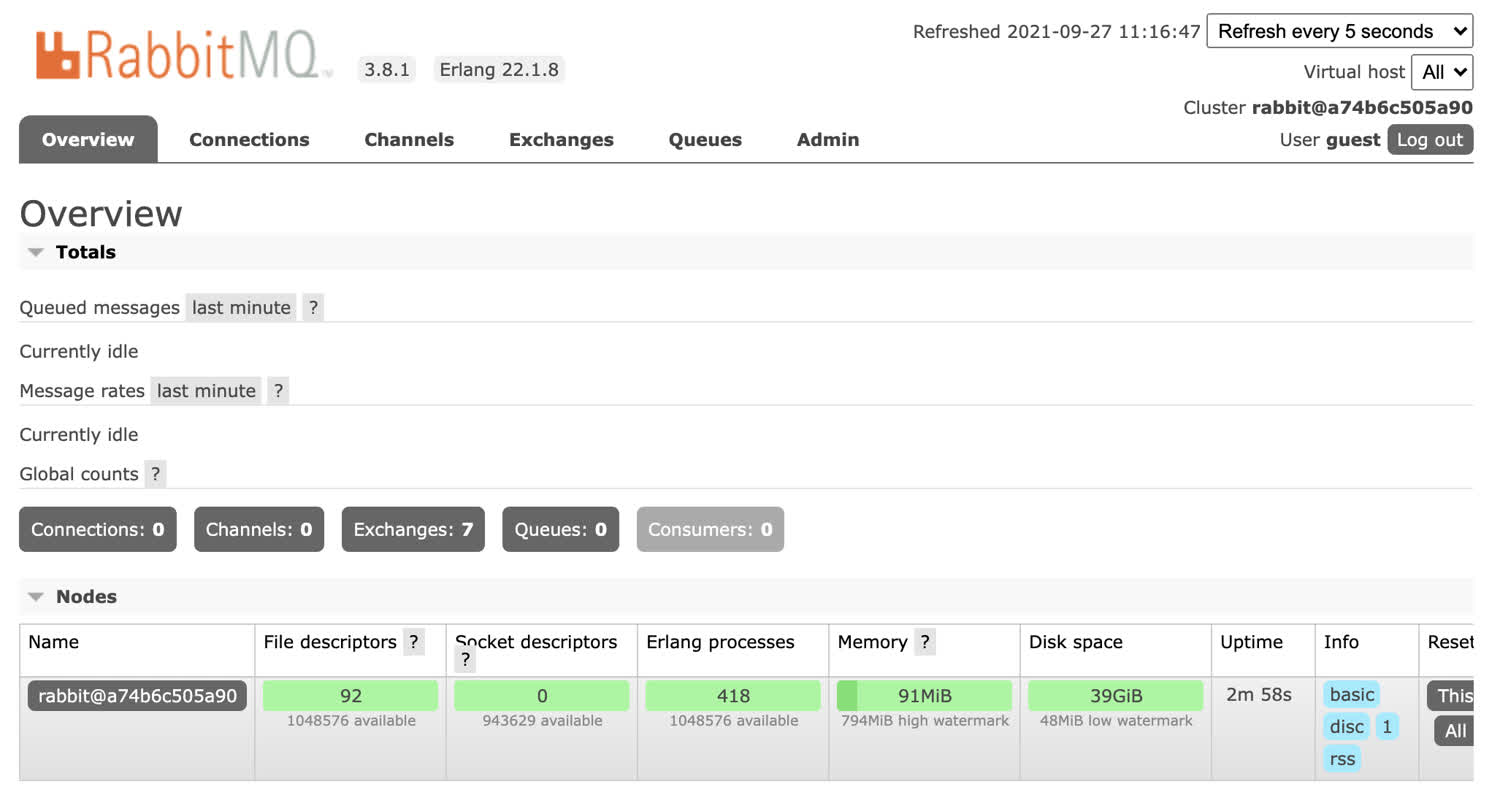
RabbitMQ’s management dashboard provides a powerful GUI for the message broker.
By default, the username is guest and the password is guest too. After logging in, you should see the management console.
This works fine, but if we’re building a microservices application we probably want the ability to startup multiple containers at the same time. Let’s move our docker command into a docker compose file so that we can startup our container alongside the microservices that will be publishing and consuming messages.
Create your project folder, and add a docker-compose.yml file inside of it.
version: '3'
services:
  rabbit:
    image: rabbitmq:3.8.1-management
    container_name: rabbit
    ports:
      - '15672:15672'
    expose:
      - 5672
    restart: always
One point of clarification: We expose 5672 so that in the future other microservices inside the docker network can communicate with RabbitMQ. We bind port 15672 to the same port on the host machine so that we can access the management console.
Now, all we need to do is to run docker-compose up and our message broker will start up.
Publishing messages to RabbitMQ with the amqplib library
Although RabbitMQ supports a variety of different languages, we’re going to be publishing and consuming messages in Node.js, a common choice for distributed applications due to its asynchronous nature and performance with IO heavy operations.
The amqplib package lets us connect to the message broker.
Inside of the folder you created the docker-compose.yml file, create a new producer folder to hold our microservice. The sole purpose of our producer microservice is to produce a message and publish it to the message broker. We will later process the message in our consumer microservice.
$ mkdir producer
$ cd producer
Inside of the producer folder, initialize the npm repository, and install your dependencies.
$ npm init -y
$ npm install express amqplib
Next, we’ll create our server file. It’s a simple express server that sends back “Hello world!” on the home route.
const express = require('express');
const path = require('path');
const app = express();

const PORT = 3000;

app.get('/', (req, res) => {
  res.status(200).send("Hello world!")
});

app.listen(PORT, () => {
  console.log(`App listening on port ${PORT}`);
});
Finally, we want a script to start up our application.
{
  "name": "teachingrabbitmq",
  "version": "1.0.0",
  "description": "",
  "main": "index.js",
  "scripts": {
    "dev:start": "node index.js"
  },
  "keywords": [],
  "author": "Harrison Cramer <kingofcramers.dev@gmail.com> (https://github.com/harrisoncramer)",
  "license": "MIT",
  "dependencies": {
    "amqplib": "^0.8.0",
    "express": "^4.17.1"
  }
}
Now, we need to write our Dockerfile. In a real application, you might have two different dockerfiles, one for development and one for production. Check out this repository to see how that’s accomplished. For now, let’s write up a simple dockerfile to start up this application.
FROM node:12.18.1-alpine

WORKDIR usr/src/app

COPY package.*json .

RUN npm install

COPY index.js .

CMD ["npm", "run", "dev:start"]
Let’s add our producer microservice to our docker-compose file now.
version: '3'
services:
  rabbit:
    image: rabbitmq:3.8.1-management
    container_name: rabbit
    ports:
      - '5672:5672'
      - '15672:15672'
    expose:
      - '5672'
      - '15672'
    restart: always
  producer:
    container_name: producer
    build:
      context: ./producer
      dockerfile: Dockerfile
    ports:
      - 3000:3000
You’ll notice a problem if you try to start our microservices like this: Our producer starts up very quickly, and attempts to connect to our RabbitMQ container, which isn’t ready, and the producer throws an error. Although we could constantly restart the producer microservice, it’s better to just have the microservices wait until the RabbitMQ container is ready. There’s a handy little npm utility called wait-port that we’ll use to accomplish this.
You may think that using the
depends_onkey in your docker compose file will accomplish the same thing. Be careful! That does not necessarily wait until RabbitMQ is ready for connections.
First, install it as a development dependency to your producer microservice.
$ npm i wait-portNext, modify the startup script so that it’ll only run after RabbitMQ is ready.
{
  "name": "teachingrabbitmq",
  "version": "1.0.0",
  "description": "",
  "main": "index.js",
  "scripts": {
    "dev:start": "npx wait-port rabbit:5672 && node index.js"
  },
  "keywords": [],
  "author": "Harrison Cramer <kingofcramers.dev@gmail.com> (https://github.com/harrisoncramer)",
  "license": "MIT",
  "dependencies": {
    "amqplib": "^0.8.0",
    "express": "^4.17.1"
    "wait-port": "^0.2.9"
  }
}
The producer microservice will now startup immediately, but the node process itself won’t begin until the RabbitMQ service is ready to handle connections. Next, we’ll use our producer microservice to publish information to our message broker.
Import the amqplib library and connect to the message broker. We pass in the URI of our message broker in the docker-compose file.
const express = require('express');
const path = require('path');
const amqplib = require("amqplib")
const app = express();

const PORT = 3000;

const { RABBIT_URI } = process.env;
if(!RABBIT_URI) {
  throw Error("Must provide message broker URI!");
}

amqplib.connect(RABBIT_URI).then(() => {
  app.get('/', (req, res) => {
    res.status(200).send("Hello world!")
  });

  app.listen(PORT, () => {
    console.log(`App listening on port ${PORT}`);
  });
});
Since we’re using docker-compose to start up both of these containers, they are both being published inside of the same network. This means that the hostname of our RabbitMQ message broker will be the name of the container.
We also need to provide the default username and password, and the port where the service is exposed (in this case, it’s 5672, not 15672, which is the management console).
version: '3'
services:
  rabbit:
    image: rabbitmq:3.8.1-management
    container_name: rabbit
    ports:
      - '15672:15672'
    expose:
      - 5672
    restart: always
  producer:
    container_name: producer
    build:
      context: ./producer
      dockerfile: Dockerfile
    ports:
      - 3000:3000
    environment:
      - RABBIT_URI=amqp://guest:guest@rabbit:5672
We can run the updated container with docker-compose up --build, which will force docker to re-create the containers and update the javascript code.
You may see an error if you’ve shut down your containers that were started with docker using “control-C” inside of the terminal. Make sure that you also run
docker-compose downto remove the old containers. Simply using “control-C” by itself will stop the containers, but will not remove them, and you’ll get a naming conflict when you try to rebuild. See what containers you have on your machine with thedocker container ls -acommand.
Now that we’ve connected to RabbitMQ, we need to actually publish a message. Let’s refactor our code slightly, so that we can use the more modern async/await syntax. We’ll wrap our code in immediately invoked function expression, or IIFE, to make this possible. Future versions of Node.js will support top-level await, but for now, we have to wrap our code this way to use await.
const express = require('express');
const path = require('path');
const amqplib = require("amqplib")
const app = express();

const PORT = 3000;

const { RABBIT_URI } = process.env;
if(!RABBIT_URI) {
  throw Error("Must provide message broker URI!");
}

(async () => {
  let channel;
  try {
    const connection = await amqplib.connect(RABBIT_URI);
    channel = await connection.createChannel();
    await channel.assertExchange('my-exchange', 'direct', { durable: true });
    await channel.assertQueue('my-exchange.log', { durable: true });
    await channel.bindQueue('my-exchange.log', 'my-exchange', 'log');
  } catch (err) {
    console.error('Could not configure RabbitMQ!');
    throw err;
  }
  app.get('/', (req, res) => {
    res.status(200).send('Hello world!');
  });

  app.listen(PORT, () => {
    console.log(`App listening on port ${PORT}`);
  });
})();
In this code, we are asserting the existence of several different RabbitMQ resources. The assertion of each is idempotent, which means that if they already exist in RabbitMQ, they will not be duplicated. We assert the existence of an exchange and a queue. We then bind the queue to the exchange, so that messages can reach it (according to the information in their routing keys). We aren’t using the queue in the producer code, but it’s best practice to assert it both in this microservice and the consumer microservice, because we don’t necessarily know which will be created first.
It’s possible to publish messages directly to RabbitMQ queues without creating an exchange. However, creating the exchange gives us more flexibility in terms of routing.
Finally, we need to publish a message to the exchange whenever someone visits the application. To do this, we must provide the correct routing key. We’re also providing the routing key of “log” as a placeholder for now. We’ll play around with different routing keys once we set up the consumer.
Notice that we also need to send our data as a buffer, because RabbitMQ expects that.
const express = require('express');
const path = require('path');
const app = express();
const amqplib = require('amqplib');

const PORT = 3001;
const { RABBIT_URI } = process.env;
if (!RABBIT_URI) {
  throw Error('Please provide RABBIT_URI!');
}

(async () => {
  let channel;
  try {
    const connection = await amqplib.connect(RABBIT_URI);
    channel = await connection.createChannel();
    await channel.assertExchange('my-exchange', 'direct', { durable: true });
    await channel.assertQueue('my-exchange.log', { durable: true });
    await channel.bindQueue('my-exchange.log', 'my-exchange', 'log');
  } catch (err) {
    console.error('Could not configure RabbitMQ!');
    throw err;
  }
  app.get('/', (req, res) => {
    const time = new Date().toString();
    channel.publish('my-exchange', 'log', Buffer.from(time));
    res.status(200).send('Hello world!');
  });

  app.listen(PORT, () => {
    console.log(`App listening on port ${PORT}`);
  });
})();
If we start up our containers again, we should now be publishing messages to our message broker whenever anyone hits our server. We can check that this is working, even though we don’t have a consumer set up yet, by navigating to the management console. Head to http://localhost:3000 in your browser, and refresh the page a few times. Then head to the management console.
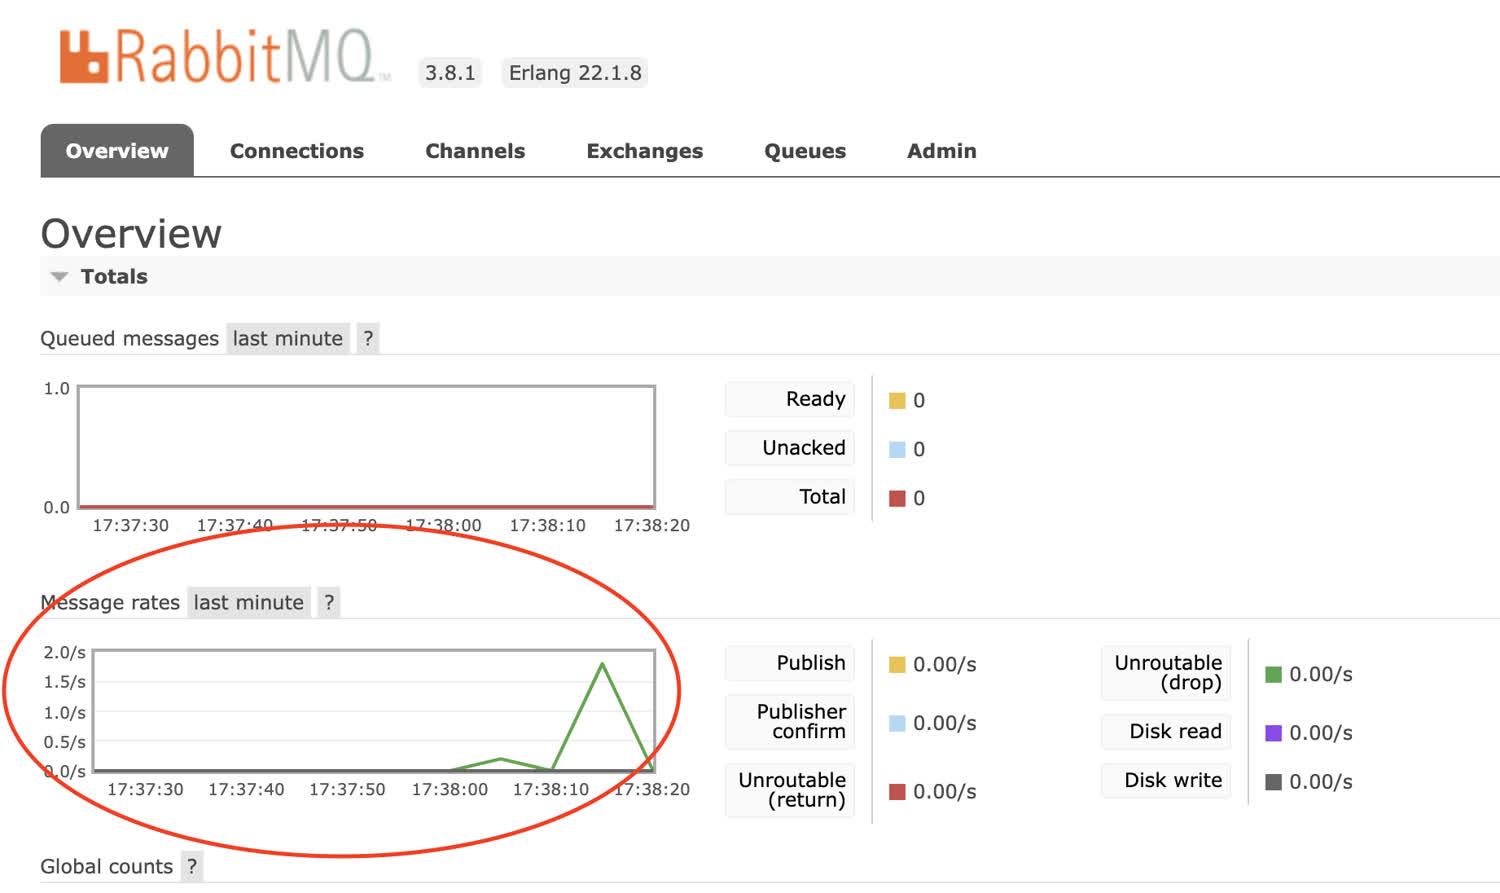
The management console shows that we’ve send a few messages to the RabbitMQ message broker.
Great, we’re publishing the times of every request to our website whenever anyone makes an HTTP request. Next, we need to consume this information in our consumer microservice.
Consuming messages from RabbitMQ
Now that we’re publishing messages to the message broker, we need to create a microservice to consume them! From within the root of your project, create a consumer folder, and initialize it with the express and amqplib packages, much like we did for the producer. Also install the socket.io library, which we’ll use to pipe the messages from our backend to our frontend in real-time.
This tutorial is focused on RabbitMQ, but this is a more in-depth tutorial of how to use the socket.io library.
$ mkdir consumer
$ cd consumer
$ npm init -y
$ npm i express amqplib socket.io wait-port
Configure your Dockerfile and package.json exactly like the other microservice.
Next, let’s create the express server. This server is going to connect to our RabbitMQ broker, and will consume messages from the “log” queue. Whenever a message is published to that queue, the consumer microservice is going to send it to a frontend via websockets. This will serve as a real-time logging interface for our other website!
Before we get to using websockets, let’s consume the messages. Instead of publishing to the exchange like we did in the producer microservice, we are consuming from the “log” queue. We’re also changing the port.
const express = require('express');
const path = require('path');
const app = express();
const amqplib = require('amqplib');

const PORT = 3001;
const { RABBIT_URI } = process.env;
if (!RABBIT_URI) {
  throw Error('Please provide RABBIT_URI!');
}

(async () => {
  try {
    const connection = await amqplib.connect(RABBIT_URI);
    const channel = await connection.createChannel();
    await channel.assertExchange('my-exchange', 'direct', { durable: true });
    await channel.assertQueue('my-exchange.log', { durable: true });
    await channel.bindQueue('my-exchange.log', 'my-exchange', 'log');
    channel.consume('my-exchange.log', (msg) => { /* Process the message */ });
  } catch (err) {
    console.error('Could not configure RabbitMQ!');
    throw err;
  }

  app.listen(PORT, () => {
    console.log(`App listening on port ${PORT}`);
  });
})();
This callback function will process messages from our queue. Let’s write that callback now. We need to acknowledge that we’ve processed the message, in order for it to be taken out of the queue. This is an important design pattern for RabbitMQ, because it ensures that we don’t have any data loss when we process messages in the queue. The message will only leave the queue once we have successfully processed it.
const express = require('express');
const path = require('path');
const app = express();
const amqplib = require('amqplib');

const PORT = 3001;
const { RABBIT_URI } = process.env;
if (!RABBIT_URI) {
  throw Error('Please provide RABBIT_URI!');
}

/* Callback for consuming RabbitMQ messages */
async function consumeViewedMessage(msg, channel) {
  try {
    const parsedMessage = msg.content.toString();
    console.log(parsedMessage);
    await channel.ack(msg);
  } catch (err) {
    console.error('Could not consume message from RabbitMQ.');
    console.log(err);
  }
}

(async () => {
  try {
    const connection = await amqplib.connect(RABBIT_URI);
    const channel = await connection.createChannel();
    await channel.assertExchange('my-exchange', 'direct', { durable: true });
    await channel.assertQueue('my-exchange.log', { durable: true });
    await channel.bindQueue('my-exchange.log', 'my-exchange', 'log');
    channel.consume('my-exchange.log', (msg) => consumeViewedMessage(msg, channel));
  } catch (err) {
    console.error('Could not configure RabbitMQ!');
    throw err;
  }

  app.listen(PORT, () => {
    console.log(`App listening on port ${PORT}`);
  });
})();
You’re almost done. You still need to do three things:
- Copy the same Dockerfile from your producer microservice into your consumer
- Write an identical startup script in your
package.jsonfile - Add the service to your
docker-composefile and supply it the necessary environment variables.
The completed docker-compose file looks like this:
version: '3'
services:
  rabbit:
    image: rabbitmq:3.8.1-management
    container_name: rabbit
    ports:
      - '15672:15672'
    expose:
      - 5672
    restart: always
  producer:
    container_name: producer
    build:
      context: ./producer
      dockerfile: Dockerfile
    ports:
      - 3000:3000
    environment:
      - RABBIT_URI=amqp://guest:guest@rabbit:5672
  consumer:
    container_name: consumer
    build:
      context: ./consumer
      dockerfile: Dockerfile
    ports:
      - 3001:3001
    environment:
      - RABBIT_URI=amqp://guest:guest@rabbit:5672
The moment of truth! Start up your application.
$ docker-compose up --buildWhen you navigate to http://localhost:3000, here’s what happens: Your producer microservice publishes a message to the RabbitMQ exchange; the exchange sees that the message’s routing key matches the binding key of the queue and sends it there; the consumer microservice consumes the message from the queue and logs it to the console; the consumer acknowledges the message and it is removed from the the queue. You should see the message appear in the console.
Congratulations, you’ve successfully connected a producer and consumer to RabbitMQ, and transferred messages between them on a direct exchange. If you’d like to see how we’d connect this to a frontend metrics dashboard, read on.
Creating the real-time dashboard with socket.io
One of the biggest advantages of using a message broker is their speed. We’re going to take advantage of that speed by making a real-time metrics dashboard inside of our consumer microservice.
The library that we’ll use to accomplish this is socket.io, install it now.
$ cd consumer
$ npm i socket.io
Create another folder inside of the consumer, and add an index.html and client.js file.
$ mkdir client
$ touch client/index.html client/client.js
Here’s the boilerplate HTML that will pull in our script. Notice that we’re also adding a div into the body, which is where we’ll append the messages that we consume from RabbitMQ. We’re not using a frontend framework, we’ll just do this with vanilla DOM manipulation.
We also import the socket.io library within the head of the file.
<!DOCTYPE html>
<html lang="en">
  <head>
    <script src="/socket.io/socket.io.js"></script>
    <meta charset="UTF-8" />
    <meta name="viewport" content="width=device-width, initial-scale=1.0" />
    <title>Document</title>
    <script src="./script.js"></script>
  </head>
  <body>
    <div id="root"></div>
  </body>
</html>
Next, let’s write the logic to process messages on the frontend. Whenever the client recieves a ‘log’ message, we append a paragraph tag to the root element on the page.
let socket = io();
socket.on('log', (msg) => {
  const log = document.createElement('p');
  log.innerText = msg;
  const target = document.getElementById('root');
  target.appendChild(log);
});
In order to send the message to the client, we’ll need to modify our existing server code. Here’s the full file. Again, if you’re curious about what’s going on here with socket.io, check out this blog post.
const express = require('express');
const path = require('path');
const amqplib = require('amqplib');
const http = require('http');

const app = express();
const server = http.createServer(app);
const { Server } = require('socket.io');

const io = new Server(server);

io.on('connection', () => {
  console.log('Client connected to the logging dashboard.');
});

const PORT = 3001;
const { RABBIT_URI } = process.env;
if (!RABBIT_URI) {
  throw Error('Please provide RABBIT_URI!');
}

/* Callback for consuming RabbitMQ messages */
async function consumeViewedMessage(msg, channel, publishToWs) {
  const parsedMessage = msg.content.toString();
  try {
    await channel.ack(msg);
    await publishToWs(parsedMessage);
  } catch (err) {
    console.error('Could not consume message from RabbitMQ.');
    console.log(err);
  }
}

/* Callback for sending messages through websockets to frontend. */
async function publishToWs(message) {
  io.emit('log', message);
}

(async () => {
  try {
    const connection = await amqplib.connect(RABBIT_URI);
    const channel = await connection.createChannel();
    await channel.assertExchange('my-exchange', 'direct', { durable: true });
    await channel.assertQueue('my-exchange.log', { durable: true });
    await channel.bindQueue('my-exchange.log', 'my-exchange', 'log');
    channel.consume('my-exchange.log', (msg) => consumeViewedMessage(msg, channel, publishToWs));
  } catch (err) {
    console.error('Could not configure RabbitMQ!');
    throw err;
  }

  app.get('/', (req, res) => {
    res.status(200).sendFile(path.resolve(__dirname, 'client', 'index.html'));
  });

  app.get('/script.js', (req, res) => {
    res.status(200).sendFile(path.resolve(__dirname, 'client', 'script.js'));
  });

  server.listen(PORT, () => {
    console.log(`App listening on port ${PORT}`);
  });
})();
That’s it! Let’s test our real-time dashboard by starting up our microservices and curl-ing the producer microservice. We’ll see the timestamps in our dashboard in real time.