


This post is intended to show newcomers to web scraping how to get up and running with Puppeteer, a NodeJS-based headless browser.
While puppeteer is an awesome tool, it doesn’t have the best documentation, and it’s very hard to get it run in production. The application relies on a large installation of Chromium—an entire web browser—on the user’s computer. This can cause issues when trying to deploy a web scraper onto a remote server. That’s why we’re putting it inside of a Docker container!
The working files for this tutorial are online in an S3 bucket here.
Initializing our project
Before we start writing our code, let’s review our what our directory structure should eventually look like:
my_scraper/
  src/
    setupPuppeteer.ts
    index.ts
  build/
    index.js
  Dockerfile
  package.json
  package-lock.json
  tsconfig.json
To begin creating our directory, let’s create a src folder and create our index.ts file inside of it. We’ll also run npm init -y inside our root folder, to initalize an npm directory, and tsc init which will create our tsconfig.json file. Next, let’s install Puppeteer. I’m installing a specific version. We’ll also need to install Typescript in order to compile our code, and ts-node to run our code in development:
$ mkdir src
$ touch src/index.ts
$ npm init -y
$ npm install puppeteer@9.1.1 typescript
$ npm install ts-node -D
Great, now our directory should look like this:
my_scraper/
  src/
    index.ts
  package.json
  package-lock.json
  tsconfig.json
Next, let’s go into our tsconfig.json file in order to configure how Typescript compiles our code:
{
  "compilerOptions": {
    "target": "ES2015",
    "module": "commonjs",
    "lib": ["ES2020", "dom"],
    "allowJs": true,
    "declaration": true,
    "outDir": "build",
    "rootDir": "src",
    "strict": true,
    "noImplicitAny": true,
    "esModuleInterop": true,
    "resolveJsonModule": true,
    "strictPropertyInitialization": false,
    "emitDecoratorMetadata": true,
    "skipLibCheck": true,
    "experimentalDecorators": true
  }
}
We’re setting the rootDir to be the source folder that holds our Typescript files, and we’re setting the outDir to point to our build folder. We also need to make sure that the dom library is included so that we can reference the HTML specification in our code.
Let’s now configure our package.json file. Remember, we need to setup a build script. This will run Typescript using our default tsconfig.json file. If we don’t pass any arguments to the compiler, it’ll do this by default.
We’ll also setup a run script to run our project in development. This won’t run inside of our Docker container, but we’ll use it while building our scraper. Since we’re using Typescript, we’re going to have to compile and then run our files in one go, which we can do with the ts-node package. We can tell ts-node to run our index.ts file.
{
  "name": "docker-puppeteer",
  "version": "1.0.0",
  "description": "ts-node src/index.ts",
  "main": "index.js",
  "scripts": {
    "build": "npx tsc",
    "start": "ts-node src/index.ts"
  },
  "keywords": [],
  "author": "your_info_will_be_here",
  "license": "MIT",
  "dependencies": {
    "puppeteer": "^9.1.1",
    "typescript": "^4.3.5"
  }
}
Nice! Now our setup is done, and we can actually start writing the scraper itself.
Writing the scraper
The first thing that we’ll do is setup our puppeteer instance. This is the headless browser that will do our actual scraping.
import puppeteer from "puppeteer";

const setupPuppeteer = async (): Promise<puppeteer.Browser> => {
  const browserOptions = {
    headless: false,
    defaultViewport: null,
    args: ["--no-sandbox", "--unlimited-storage"],
  };

  const browser = await puppeteer.launch(browserOptions);

  browser.on("disconnected", () => {
    console.log("Browser was disconnected.");
  });

  console.log("Configured puppeteer.");

  return browser;
};
This will create a new browser that we can import into our project. We want to keep our index.ts file as clean as possible, so we’ll place this logic in a separate file, and import it. Then inside of our main file, we can call this function and await the result, which is our browser.
The browser has a lot of different methods attached, like the .close() method, which we’ll use at the end our script. For now, we want to create a new page:
import { setupPuppeteer } from "./setupPuppeteer";

async function execute() {
  const browser = await setupPuppeteer();
  const page = await browser.newPage(); // Should open a new page with Chromium.
}

execute();
Let’s try running our project locally first. Run our development script:
$ npm run startAnd you should see a Chromium browser open a new page! Great. When you close out of the NodeJS process, the browser will exit.
Next, we need to write the logic of navigating to a page, and scraping down the data. In this case, we’re going to pull down the tile of a dummy website.
import { setupPuppeteer } from "./setupPuppeteer";

async function execute() {
const browser = await setupPuppeteer();
const page = await browser.newPage(); // Should open a new page with Chromium.
await page.goto("https://www.example.com");
}

execute();
Although some libraries exist to help us parse HTML, like cheerio, they generally require you to convert text into HTML. Instead, we’re going to use Puppeteer’s built-in page.evaluate function to run code directly inside the browser. This function will return a promise, so we should await its result.
The first argument to the function is a callback function, and the second argument is any values we want to pass into the callback as arguments.
import { setupPuppeteer } from "./setupPuppeteer";

async function execute() {
  const browser = await setupPuppeteer();
  const page = await browser.newPage(); // Should open a new page with Chromium.
  await page.goto("https://www.example.com");
  await page.evaluate(({ myString }: { myString: string }) => {
    console.log(myString);
  }, { myString: "Hello World!" })
}

execute();
If we open up the development tools in our browser, we should be able to see “Hello World” inside of our browser.
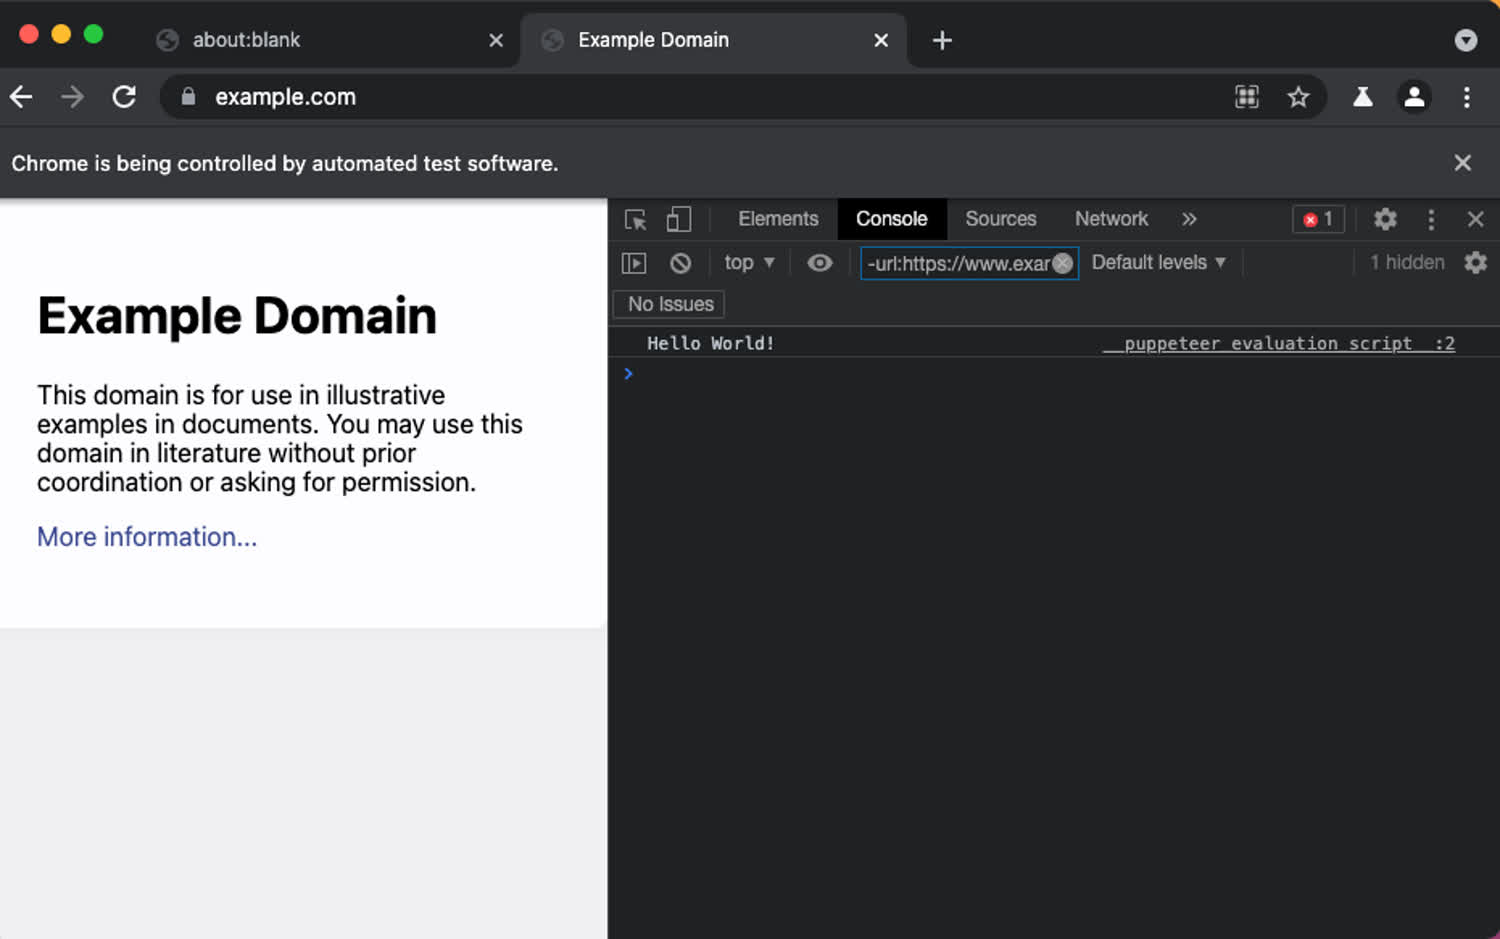
Our code will log our variable inside the console.
This shows us how to pass variables into our scraper, which is very powerful! We could loop through pages, passing different variables for each page, or perform some other complicated logic using this feature.
Next, let’s return something from the page. We can return the result of calling the page.evaluate into a variable. This will be the result of whatever is returned inside the callback. This means that we can return results from the page!
Let’s grab the text of the title page, and return that. Then we can log it locally! Finally, we’ll close out of our browser.
import { setupPuppeteer } from "./setupPuppeteer";

async function execute() {
  const browser = await setupPuppeteer();
  const page = await browser.newPage(); // Should open a new page with Chromium.
  await page.goto("https://www.example.com");
  const title = await page.evaluate(({ mySelector }) => {
    return document.querySelector(mySelector)?.innerHTML
  }, { mySelector: "h1" })
  console.log(title);
  await browser.close();
}

execute();
This is the basic structure of our scraper! We can easily now navigate to different pages, extract different information from the page, and do something with it, like placing it into our database.
Let’s build our project and run it to make sure that everything is working:
$ npm run build
$ node build/index.js

Configured puppeteer.
Browser was disconnected.
Example Domain
Setting up the Dockerfile
The Dockerfile will contain all the information required to install and run our application code remotely. This will ensure that, rather than assuming a user has Chromium installed, it gets bundled with our scraper. This will let us run our scraper remotely.
Before continuing, we’re going to have to make a few small tweaks to our setupPuppeteer.ts file. Currently we’re not running the browser in headless mode. This will break inside of a container, which doesn’t have a GUI. Simply change the headless option:
const setupPuppeteer = async (): Promise<puppeteer.Browser> => {
  const browserOptions = {
    headless: true,
    defaultViewport: null,
    args: ["--no-sandbox", "--unlimited-storage"],
  };

  const browser = await puppeteer.launch(browserOptions);

  browser.on("disconnected", () => {
    console.log("Browser was disconnected.");
  });

  console.log("Configured puppeteer.");

  return browser;
};
Our next change will make sense when we start writing our Dockerfile.
Rather than reinventing the wheel, we’re going to base our image on one supplied by buildkite which will install Chromium, and ensure that we have access to npm and node.
We’re also setting a workdir which is where we’ll store all of our code inside of the container.
FROM node:14.16.0-buster-slim@sha256:ffc15488e56d99dbc9b90d496aaf47901c6a940c077bc542f675ae351e769a12
WORKDIR /app
RUN  apt-get update \
     && apt-get install -y wget gnupg ca-certificates procps libxss1 \
     && wget -q -O - https://dl-ssl.google.com/linux/linux_signing_key.pub | apt-key add - \
     && sh -c 'echo "deb [arch=amd64] http://dl.google.com/linux/chrome/deb/ stable main" >> /etc/apt/sources.list.d/google.list' \
     && apt-get update \
     && apt-get install -y google-chrome-stable \
     && rm -rf /var/lib/apt/lists/* \
     && wget --quiet https://raw.githubusercontent.com/vishnubob/wait-for-it/master/wait-for-it.sh -O /usr/sbin/wait-for-it.sh \
     && chmod +x /usr/sbin/wait-for-it.sh
This lets us install Chromium using apt-get which is the package manager provided with this image. We do this using Docker’s RUN command. We’re also installing the various certificates that we need to run our scripts.
Now we can see the second change we’ll have to make to our setupPuppeteer.ts file: We’re installing Chromium inside of our Dockerfile, but we’re not using it yet, because we’re relying on the version that gets installed with puppeteer by default. We only need one of these installations. Let’s change puppeteer to puppeteer-core, which does not install Chromium by itself.
$ npm uninstall puppteer
$ npm install puppeteer-core
We’ll also need to tweak our setupPuppeteer.ts file to use the correct dependency, puppeteer-core, and to point to our locally installed version of Chromium inside of our Docker container. It’s installed with the Dockerfile script at /usr/local/bin/google-chrome-stable
import puppeteer from "puppeteer-core";

const setupPuppeteer = async (): Promise<puppeteer.Browser> => {
  const browserOptions = {
    headless: true,
    defaultViewport: null,
    args: ["--no-sandbox", "--unlimited-storage"],
    executablePath: "/usr/bin/google-chrome-stable",
  };

  const browser = await puppeteer.launch(browserOptions);

  browser.on("disconnected", () => {
    console.log("Browser was disconnected.");
  });

  console.log("Configured puppeteer.");

  return browser;
};
Now, every time we rebuild our image, if we update our node dependencies, Docker will know to rely on the already installed layer, rather than re-downloading Chromium every time.
Next, we’ll copy over and install our dependencies inside of package.json and package-lock.json and install them. We’ll also copy over the files inside of our src directory and the tsconfig.json file, which will be used to build our Typescript files into Javascript, when we run our build command.
FROM node:14.16.0-buster-slim@sha256:ffc15488e56d99dbc9b90d496aaf47901c6a940c077bc542f675ae351e769a12
WORKDIR /app
RUN  apt-get update \
     && apt-get install -y wget gnupg ca-certificates procps libxss1 \
     && wget -q -O - https://dl-ssl.google.com/linux/linux_signing_key.pub | apt-key add - \
     && sh -c 'echo "deb [arch=amd64] http://dl.google.com/linux/chrome/deb/ stable main" >> /etc/apt/sources.list.d/google.list' \
     && apt-get update \
     && apt-get install -y google-chrome-stable \
     && rm -rf /var/lib/apt/lists/* \
     && wget --quiet https://raw.githubusercontent.com/vishnubob/wait-for-it/master/wait-for-it.sh -O /usr/sbin/wait-for-it.sh \
     && chmod +x /usr/sbin/wait-for-it.sh

############
## NodeJS ##
############

COPY package*.json .
RUN npm install

COPY tsconfig.json .
COPY src ./src
RUN npm run build
Finally, we’re going to use Docker’s CMD command to tell the container what command to run at startup. We’ll tell it to use node to run the file inside of our build folder.
FROM node:14.16.0-buster-slim@sha256:ffc15488e56d99dbc9b90d496aaf47901c6a940c077bc542f675ae351e769a12
WORKDIR /app
RUN  apt-get update \
     && apt-get install -y wget gnupg ca-certificates procps libxss1 \
     && wget -q -O - https://dl-ssl.google.com/linux/linux_signing_key.pub | apt-key add - \
     && sh -c 'echo "deb [arch=amd64] http://dl.google.com/linux/chrome/deb/ stable main" >> /etc/apt/sources.list.d/google.list' \
     && apt-get update \
     && apt-get install -y google-chrome-stable \
     && rm -rf /var/lib/apt/lists/* \
     && wget --quiet https://raw.githubusercontent.com/vishnubob/wait-for-it/master/wait-for-it.sh -O /usr/sbin/wait-for-it.sh \
     && chmod +x /usr/sbin/wait-for-it.sh

############
## NodeJS ##
############

COPY package*.json .
RUN npm install

COPY tsconfig.json .
COPY src ./src
RUN npm run build

CMD ["node", "build/index.js"]
At this point, we’ve got a container that will:
- Download the Chrome web browser.
- Copy our
package.jsonfile and download our dependencies. - Copy our source files and build them.
- Run our built files in production.
Running our application
We should now be able to build our image. Let’s do that now, inside the root of our project.
$ docker build -t docker-puppeteer .
$ docker images
REPOSITORY                       TAG       IMAGE ID       CREATED         SIZE
docker-puppeteer                 latest    eab61f8ff354   8 seconds ago   1.27GB
In order to see that our scraper is running correctly, we can run it. This should pipe the output of our Docker container directly to our console, which will log the result to the screen, and then exit. That’s it!
$ docker run docker-puppeteer
Configured puppeteer.
Browser was disconnected.
Example Domain
Next steps
We hardcoded in the path to Chromium, which won’t work in development if you’ve got Chromium/Chrome installed at a differetn location. You could easily pass this in as an environment variable in order to run this code in development and keep using puppeteer-core.
We might also use this same structure to run a number of different scrapers in sequence, for instance with Promise.all(), or on a regular cycle, for instance with the cron scheduler. The possibilities are endless!
As always, hit me up on Twitter if you have any questions!