


Myself and some other engineers were in the process of deploying loql.land to a production environment last weekend, and I noticed that we had forgotten to optimize the webpack build. The lighthouse scores were horrific: We were shipping around 9MB to the client! After a few hours of work (mostly research) we were able to cut our bundle size to less than 100KB.
Here are some of the steps we took, which are generally applicable to all projects. This tutorial is written for Webpack v5, and assumes you have a simple working repository that you would like to optimize. If you’d rather view our finished code, you can download it from my S3 bucket.
If you’re unfamiliar with tar files, this guide will help you expand the repository!
Split up your webpack files
This isn’t an optimization per-se, but an important prerequisite that will make optimizing your bundle easier.
For this project, we have multiple webpack configuration files. Our webpack.prod.js file contains all of our production optimizations, and the webpack.dev.js contains our development server. The webpack.common.js has all of the boilerplate necessary for both environments to run, like entry points and babel.
We used webpack-merge to merge these configuration files together. Let’s take a look at our common webpack file first. The file is split up here for readability.
const path = require('path');
const webpack = require('webpack');
const HtmlWebpackPlugin = require('html-webpack-plugin');
const Dotenv = require('dotenv-webpack');

module.exports = {
  entry: {
    index: './client/index.js',
    bundle: './client/app.jsx',
    loQL: './node_modules/loql-cache/loQL.js',
  },
  output: {
    path: path.resolve(__dirname, '..', 'build'),
    filename: '[name].js',
    clean: true,
  },

  ...
We’re setting our entry files and output files. The [name] syntax will let webpack split our bundle up into chunks, rather than stuff all of our code into a single bundle file. Let’s continue.
  ...

  module: {
    rules: [
      {
        test: /.(js|jsx)$/,
        exclude: /node_modules/,
        loader: 'babel-loader',
        options: {
          presets: ['@babel/preset-react'],
        },
      },
      {
        test: /\.(png|jpg|jpeg|ico|mp4)$/i,
        use: [
          {
            loader: 'url-loader',
            options: {
              limit: 8192,
            },
          },
        ],
      },
    ],
  }

  ...
Here, we’re running all of our javascript files through babel in order to compile them down to vanilla javascript. We’re also sending our static files—images, videos, and so forth—through the url-loader, which creates URLs that we can use in our code.
  ...

  plugins: [
    new Dotenv({
      path: path.resolve(__dirname, `../.${process.env.NODE_ENV}.env`),
    }),
    new HtmlWebpackPlugin({
      template: './client/index.html',
      favicon: './client/assets/favicon.ico',
    }),
  ],
  resolve: {
    extensions: ['.js', '.jsx'],
  },
};
Finally, we’re using a few plugins here. One will grab environment variables from our environment files. Those files are going to be named according to the environment that we’re in, either as .development.env or .production.env, respectively. Lastly, we’re using another plugin to dynamically create our HTML file.
Let’s take a look at our production file now.
const { merge } = require('webpack-merge');
const TerserPlugin = require('terser-webpack-plugin');
const MiniCssExtractPlugin = require('mini-css-extract-plugin');
const CssMinimizerPlugin = require('css-minimizer-webpack-plugin');

const common = require('./webpack.common.js');
module.exports = merge(common, {
  mode: 'production',
  module: {
    rules: [
      {
        test: /\.css$/i,
        use: [MiniCssExtractPlugin.loader, 'css-loader'],
      },
      {
        test: /\.s[ac]ss$/i,
        exclude: /node_modules/,
        use: [MiniCssExtractPlugin.loader, 'css-loader', 'sass-loader'],
      },
    ],
  },
  plugins: [new MiniCssExtractPlugin()],
  optimization: {
    minimize: true,
    minimizer: ['...', new CssMinimizerPlugin()],
  },
  resolve: {
    extensions: ['.js', '.jsx'],
  },
});
This file is shorter because it’s additive—we run these optimizations when we are building a production version of our site. To accomplish this, we are calling the merge function and exporting the result. In order to pick up this configuration, we point the webpack CLI at the production file using the --config flag.
{
  "name": "loql.land",
  "version": "1.0.0",
  "description": "",
  "main": "index.js",
  "scripts": {
    "start": "concurrently \"npm run dev:webpack\" \"npm run dev:express\"",
    "dev:webpack": "NODE_ENV=development webpack serve --config ./webpack/webpack.dev.js",
    "dev:express": "NODE_ENV=development PORT=3000 nodemon server/index.js",
    "prod:webpack": "NODE_ENV=production webpack --config ./webpack/webpack.prod.js",
    "prod:express": "NODE_ENV=production PORT=3000 node server/index.js",
    "prod:analyze": "NODE_ENV=production ANALYZE=true webpack --config ./webpack/webpack.prod.js"
  }

  ...
Great, now that we actually understand how these files are getting merged and run, what are the actual optimizations that are in place?
Production mode
This one may seem obvious, but it’s easy to miss. Make sure that Webpack is in production mode. This enables a some important defaults, including the Terser plugin, which helps minify and uglify your code.
const { merge } = require('webpack-merge');
const TerserPlugin = require('terser-webpack-plugin');
const MiniCssExtractPlugin = require('mini-css-extract-plugin');
const CssMinimizerPlugin = require('css-minimizer-webpack-plugin');

const common = require('./webpack.common.js');
module.exports = merge(common, {
  mode: 'production',
  module: {
    rules: [
      {
        test: /\.css$/i,
        use: [MiniCssExtractPlugin.loader, 'css-loader'],
      },
      {
        test: /\.s[ac]ss$/i,
        exclude: /node_modules/,
        use: [MiniCssExtractPlugin.loader, 'css-loader', 'sass-loader'],
      },
    ],
  },
  plugins: [new MiniCssExtractPlugin()],
  optimization: {
    minimize: true,
    minimizer: ['...', new CssMinimizerPlugin()],
  },
  resolve: {
    extensions: ['.js', '.jsx'],
  },
});
In previous versions of webpack, you had to manually configure this functionality yourself. It’s now provided by default!
Remove source maps
This is another one that’s easy to miss. Source maps are a valuable debugging tool when running in development. We’re using them in our development configuration.
import { merge } from 'webpack-merge';
import common from './webpack.common.js';

export default merge(common, {
  devtool: 'eval-source-map',
  mode: 'development',
  module: {
    rules: [
      {
        test: /\.s[ac]ss$/i,
        exclude: /node_modules/,
        use: ['style-loader', 'css-loader', 'sass-loader'],
      },
      {
        test: /\.css$/i,
        use: ['style-loader', 'css-loader'],
      },
    ],
  }

  ...
However, these source maps are extraordinarily heavy. You’ll notice a major performance hit if you forget to take them out in production. For this particular site, our compiled code is roughly three times larger with the development source maps included!
Minify and Uglify your CSS/JS
When you set the production mode, webpack will automatically minify and uglify your Javascript. Minification refers to the practice of shrinking down your files—by removing white space, removing line breaks, and so forth. Uglification refers to the practice of actually renaming functions, variables, and other code (typically, to very short values). These two features combined can shrink our code significantly.
We also want to minify and uglify our stylesheets. To do this, we installed one plugin to pull our CSS out of our Javascript bundle, and another to actually minify and uglify the code.
When it compiles your code, webpack will normally pack all of your styles alongside your Javascript code. The css is then pulled out when your code is run. That’s why you could have just one output file, like a bundle.js file. We want to pull the CSS out of that bundle so that we can minify and uglify it.
const { merge, unique } = require('webpack-merge');
const TerserPlugin = require('terser-webpack-plugin');
const MiniCssExtractPlugin = require('mini-css-extract-plugin');
const CssMinimizerPlugin = require('css-minimizer-webpack-plugin');
const { BundleAnalyzerPlugin } = require('webpack-bundle-analyzer');

const common = require('./webpack.common.js');
module.exports = merge(common, {
  mode: 'production',
  module: {
    rules: [
      {
        test: /\.css$/i,
        use: [MiniCssExtractPlugin.loader, 'css-loader'],
      },
      {
        test: /\.s[ac]ss$/i,
        exclude: /node_modules/,
        use: [MiniCssExtractPlugin.loader, 'css-loader', 'sass-loader'],
      },
    ],
  },
  plugins: [
    new MiniCssExtractPlugin(),
    ...(process.env.ANALYZE ? [new BundleAnalyzerPlugin()] : []),
  ],
  optimization: {
    minimize: true,
    minimizer: ['...', new CssMinimizerPlugin()],
  },
  resolve: {
    extensions: ['.js', '.jsx'],
  },
});
This optimization is particularly useful if you’re relying on an external library like Bootstrap that ships with a lot of CSS. Speaking of which…
Analyze your bundle and & remove large packages
Tweaking the webpack configuration is only going to get you so far if the code itself is unnecessarily bloated. You should also examine your application code and ensure that you aren’t relying on large or bloated libraries.
The easiest way to do this is to install the webpack bundle analyzer, which shows you which libraries are taking up the most space in your bundle. We wrote a separate script to use our bundle analyzer with our production configuration file. To do this, we’re passing the ANALYZE environment variable and using that variable to load the plugin after our build is complete.
{
  "name": "loql.land",
  "version": "1.0.0",
  "description": "",
  "main": "index.js",
  "scripts": {
    "start": "concurrently \"npm run dev:webpack\" \"npm run dev:express\"",
    "dev:webpack": "NODE_ENV=development webpack serve --config ./webpack/webpack.dev.js",
    "dev:express": "NODE_ENV=development PORT=3000 nodemon server/index.js",
    "prod:webpack": "NODE_ENV=production webpack --config ./webpack/webpack.prod.js",
    "prod:express": "NODE_ENV=production PORT=3000 node server/index.js",
    "prod:analyze": "NODE_ENV=production ANALYZE=true webpack --config ./webpack/webpack.prod.js"
  },
  "repository": {
    "type": "git",

...
This variable is picked up inside of our configuration file and is used to add the plugin.
  plugins: [
    new MiniCssExtractPlugin(),
    ...(process.env.ANALYZE ? [new BundleAnalyzerPlugin()] : []),
  ],
});
The analyzer plugin will startup a server on localhost:8888 that will show a nice visualization of our bundled code. Here’s what it looks like.
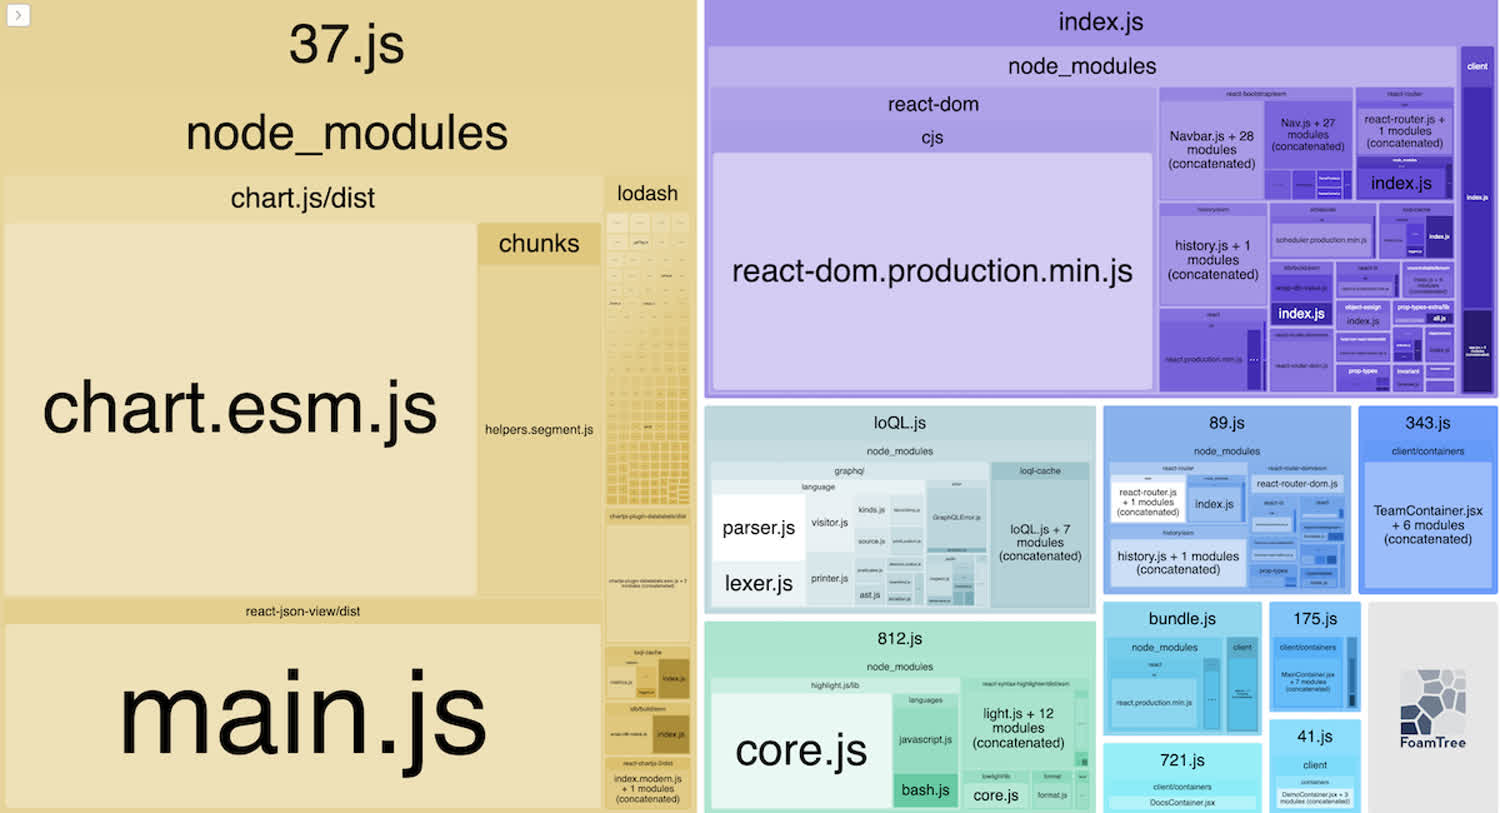
This is what the bundle-analyzer plugin looks like. It’s pretty awesome.
The biggest dependencies for this particular project are bootstrap and ChartJS, particularly the latter. How can we slim these down?
First and foremost, check your import statements. Make sure that you’re not importing the entire package and then destructuring different functions and properties off of it. Instead, only import the values that you need. For instance, try to avoid imports like this whenever possible.
import * as myObject from "my-dependency";Instead, only import the stuff you need.
import myObject from "my-dependency/lib/myObject";This can dramatically reduce your bundle size, especially with big libraries like Bootstrap. Notice in our project, for instance, that we’re importing all of our bootstrap components like this. For instance, in the footer component.
import React from 'react';
import { Link } from 'react-router-dom';
import Container from 'react-bootstrap/Container';
import Navbar from 'react-bootstrap/Navbar';
import Nav from 'react-bootstrap/Nav';
import './Footer.scss';

const Footer = () => {

...
If the library requires you import it wholesale, and the library is very bloated, think hard about about removing it. In our case, we may swap out ChartJS for D3. We’re only using ChartJS to render a few bar charts, is it really worth that extra bloat in our codebase? Probably not.
Lazy loading
This is another step that will require to you refactor your code slighly, but it’s worth it.
Lazy loading lets users download your application in pieces. Rather than downloading everything at once, which would take a long time, lazy loading lets users download the code for the current view. When they switch views, they make another, small network request for another portion of your code. Webpack accomplishes this by splitting your code into “chunks.”
In loQL, we lazy load according to specific routes in our router. Let’s take a look at our app.jsx file, which contains our routing.
import '@fontsource/roboto';
import '@fontsource/poppins';
import '@fontsource/ibm-plex-sans';

import React, { lazy, Suspense } from 'react';
import { BrowserRouter as Router, Route, Switch } from 'react-router-dom';
import NavBar from './components/Navbar';
import Footer from './components/Footer';
import Loading from './components/Loading';

const DemoContainer = lazy(() => import('./containers/DemoContainer'));
const MainContainer = lazy(() => import('./containers/MainContainer'));
const TeamContainer = lazy(() => import('./containers/TeamContainer'));
const DocsContainer = lazy(() => import('./containers/DocsContainer'));

...
To make the lazy function work, we also need to wrap the routes in the Suspense component, also supplied by React, and provide a fallback to render when the fetch is occuring. In our case, we render a loading component.
...

const App = () => {
  return (
    <Router>
      <NavBar />
      <div className="content-wrapper">
        <Switch>
          <Suspense fallback={<Loading />}>
            <Route path="/demo">
              <DemoContainer />
            </Route>
            <Route path="/docs">
              <DocsContainer />
            </Route>
            <Route path="/team">
              <TeamContainer />
            </Route>
            <Route exact path="/">
              <MainContainer />
            </Route>
          </Suspense>
        </Switch>
      </div>
      <Footer className="footer" />
    </Router>
  );
};

export default App;
The lazy function that we’re importing from React returns a promise. Intead of directly importing our various views and then adding those to our router, we’re using the lazy function to only import them when the user navigates to the relevant page in our router.
Weback is smart enough to see this code and split our code into chunks, which will be loaded piecemeal when the user navigates around our site. They won’t have to download code they won’t to use, and the overall experience of the application will be better.
Optimize your media
Across the board, make sure that you’re optimizing the media you serve to your clients. If you’ve got images, make sure they are not gigantic in width and height, and also make sure that you run them through tinypng or another comparable image compressor to reduce their size.
You also should really avoid using GIFs, which can be absolutely massive in size. Instead, convert the GIFs to MP4 files (I use an awesome free tool called ffmpeg that is quick and easy) which are much smaller. You can then autoplay those videos.
import React, { Component, useState, useEffect } from 'react';
import { Link } from 'react-router-dom';
import Container from 'react-bootstrap/Container';
import rider from '../assets/rider.mp4';

import Row from 'react-bootstrap/Row';
import Col from 'react-bootstrap/Col';
import Card from 'react-bootstrap/Card';

import './Main.scss';

const SplashPage = () => {
  return (
    <div className="main-content">
      <Container>
        <article className="main">
          <div className="splash">
            <div id="main-left">
              <div className="bigTitle">Fast, offline GraphQL caching</div>
              <div className="bigDescription">
                loQL is a lightweight, open source npm package that caches API requests with service
                workers, unlocking performance gains and enabling offline use.
              </div>
            </div>
            <div id="main-right">
              <video autoPlay loop muted playsInline className="bike-animation">
                <source src={rider} type="video/mp4" />
              </video>
            </div>
          </div>

          ...
For more detail on this process, this post is very helpful.
Compression (gzip, brotli)
This step is not necessarily going to happen inside of webpack, but it’s worth mentioning. Make sure that however you’re serving up your content, you’re using some sort of compression, like gzip for instance.
Modern browsers will ask for a compressed version of every file by default first, and know how to decompress it themeselves. Turning on compression is therefore an easy win that you can set up with a few lines of code.
Our React application is sitting behind Nginx. Here’s part of our reverse proxy configuration.
user www-data;
worker_processes auto;
pid /run/nginx.pid;
include /etc/nginx/modules-enabled/*.conf;

events {
  worker_connections 768;
}

http {
  sendfile on;
  tcp_nopush on;
  tcp_nodelay on;
  keepalive_timeout 65;
  types_hash_max_size 2048;
  include /etc/nginx/mime.types;
  default_type application/octet-stream;

  ssl_protocols TLSv1 TLSv1.1 TLSv1.2;
  ssl_prefer_server_ciphers on;

  access_log /var/log/nginx/access.log;
  error_log /var/log/nginx/error.log;

  gzip on;

  gzip_vary on;
  gzip_proxied any;
  gzip_comp_level 6;
  gzip_buffers 16 8k;
  gzip_http_version 1.1;
  gzip_types text/plain text/css application/json application/javascript text/xml application/xml application/xml+rss text/javascript;

  include /etc/nginx/conf.d/*.conf;
  include /etc/nginx/sites-enabled/*;
}
This tutorial isn’t going to go into the details of what a reverse proxy is and why that’s used with NodeJS, but suffice to say that however you’re serving up your content—whether through Apache, Nginx, or any other webserver—you should be using compression.