


You’ve just built an amazing application, and everything is running smoothly. You push up your image to Docker Hub, and it takes a while. Curious, you take a look at the size of the image file: 2GB! Docker images contain everything you need to run your code—and sometimes a lot more. Let’s take a look at a few strategies you can employ to reduce the size of those images, so that your CI/CD process is effient. Smaller containers also have fewer vulnerabilities.
We’ll also discuss a few strategies you can take to harden your containers, including running as non-root and “distroless” containers.
Containers, Images, and Layers
Before we go about optimizing our Docker images, it’s important to have a basic understanding of how “layers” work. What are they?
When docker mounts the root filesystem, it does not make it readable and writable. Instead, the daemon stacks several read-only filesystems on top of each other. These filesystems are the “layers” that comprise the full image. This build process allows the daemon to easily diff between layers—when rebuilding an image, it only has to rebuild the layers that you have changed, because the previous layers are guaranteed to be the same.
These layers are added via different lines inside the Dockerfile. For instance, when we use the ADD command or the COPY command, then Docker will create a new layer.
The images inside of a Dockerfile are hidden by default when we run it, but we can see them by running the docker image history command.
Let’s pull down an image from online to take a look at its layers. We’ll be examining the nginxdemos/hello image, which is a simple webserver, so let’s pull it now:
$ docker pull nginxdemos/hello
Using default tag: latest
latest: Pulling from nginxdemos/hello
29291e31a76a: Pull complete
e82f830de071: Pull complete
d7c9fa7589ae: Pull complete
3c1eaf69ff49: Pull complete
bf2b3ee132db: Pull complete
9a6ac07b84eb: Pull complete
4c3af8bdc554: Pull complete
50f631e9d184: Pull complete
e8d302c1098e: Pull complete
Digest: sha256:c2458c1d0f24dfdbfab93b131a7b3b61098abe74999128461c6c095f6d9fd320
Status: Downloaded newer image for nginxdemos/hello:latest
docker.io/nginxdemos/hello:latest
Looks good. Notice that we are pulling down all the layers for this particular image, and each one has a specific hash associated with it. What if we want to see exactly what is inside each layer? We can use an awesome open-source tool called dive that lets us inspect the image. I’m going to install it with brew, which is a Mac-specific package manager.
$ brew install diveNext, we can run dive on a certain image and it’ll let us see the layers in more detail.
$ dive nginxdemos/helloThe output of running this command is an interactive CLI, that shows us what files were added to the filesystem with each layer.
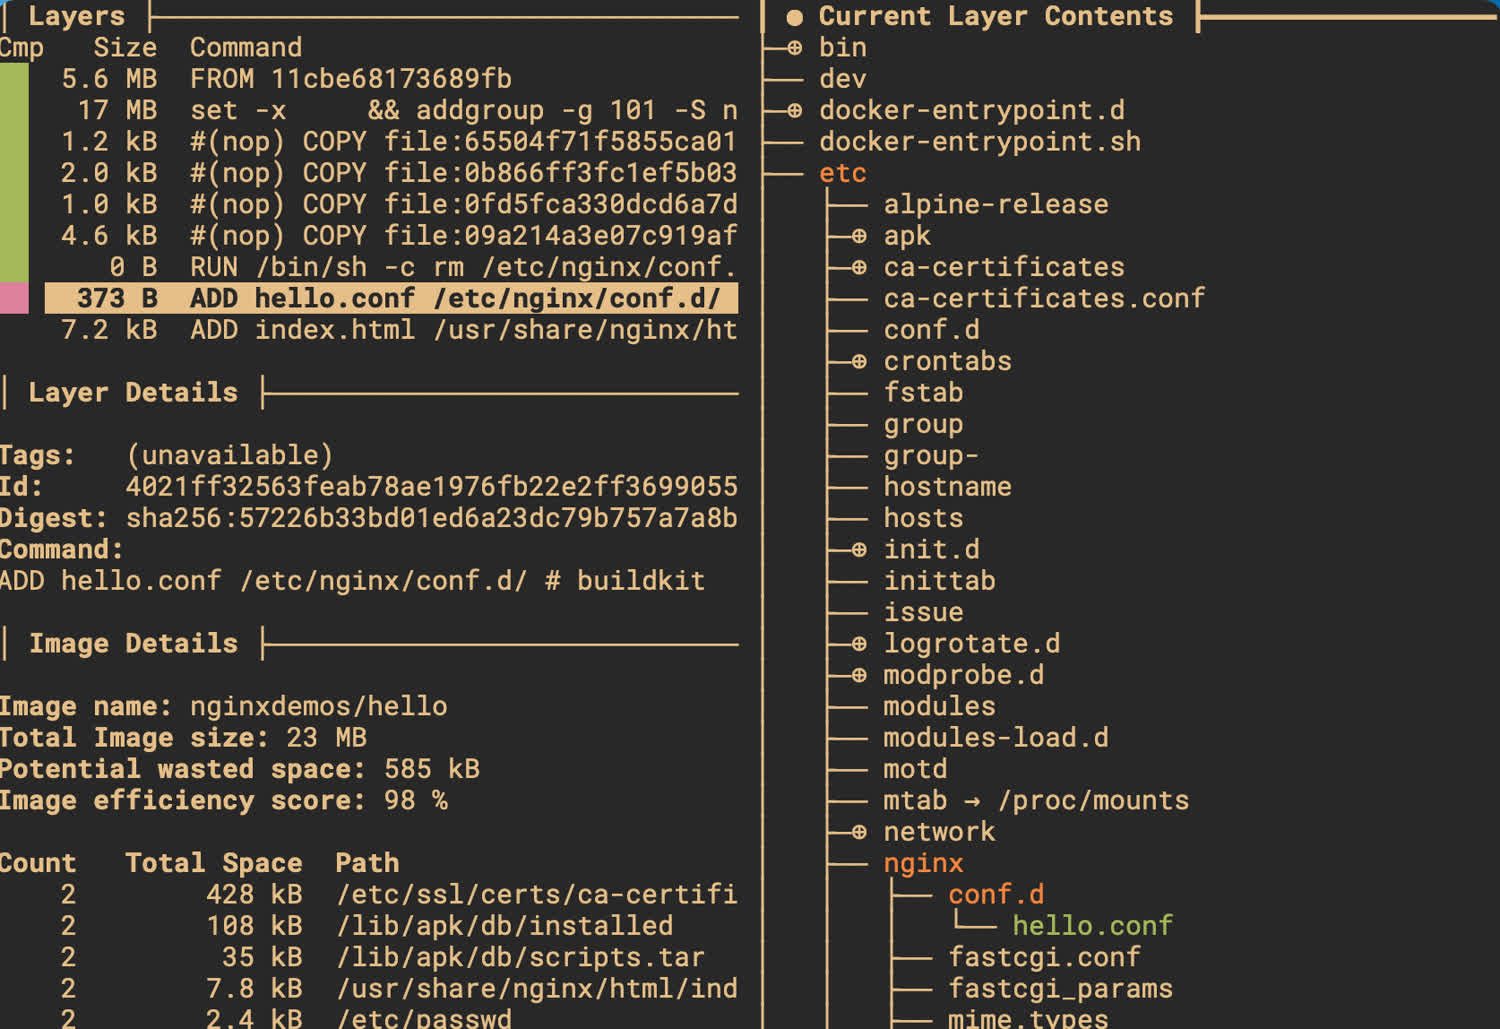
You can use the dive tool to inspect the layers of an image more closely.
As you can see in the above image, the Dockerfile ran ADD hello.conf /etc/nginx/conf.d/, which created a single file inside the /etc/nginx/conf.d directory. The resulting layer was just 373 bytes in size, which is quite small. The base OS for this image is 5.6MB, which is 5.6 million bytes!
Layers in production
What does this all mean for production? We want to ensure that the production version of our docker image is as small as possible, so that we aren’t copying over lots of data needlessly every time. That means both minimizing the number of layers, and minimizing their size.
We’ll write a simple application below to demonstrate a few of those principles. First, we’ll write it without optimizing at all. Then, we’ll rewrite the application to shrink down our image as much as possible.
Creating our unoptimized image
Let’s create our Javascript files first. Our application is going to be a simple express server.
const express = require('express');

const app = express();

const port = 3000;

app.get('/', (req, res) => {
  res.status(200).send('Hello, world!');
});

app.listen(port, () => {
  console.log(`Application listening on port ${port}`);
});
Let’s now install our only dependency, ExpressJS, which is a NodeJS library for writing HTTP servers.
$ npm init -y
$ npm install express
Finally, we’ll set up our start script in our package.json file to run our index.js file. This is the script that’ll be run by our docker container after startup.
{
  "name": "docker_tutorial",
  "version": "1.0.0",
  "description": "",
  "main": "index.js",
  "scripts": {
    "start": "node index.js"
  },
  "keywords": [],
  "author": "Harrison Cramer <kingofcramers.dev@gmail.com> (https://github.com/harrisoncramer)",
  "license": "MIT",
  "dependencies": {
    "express": "^4.17.1"
  }
}
Our Dockerfile will simply copy over our index.js file into a working directory, and run the start script.
FROM node:16.0.0
WORKDIR /app
COPY . .
RUN npm install
CMD ["npm", "start"]
Now, let’s build our image. Inside the same directory as the Dockerfile and the javascript file, run this command (don’t forget the period, which tells Docker to look in the current directory for the dockerfile):
$ docker build -t docker_tutorial .This command should give you a lot of output. The docker daemon has to reach out to Docker Hub and download all of the data associated with the base images for our project to work. We can now run the container.
$ docker run --rm -it -p 3000:300 docker_tutorial
> docker_tutorial@1.0.0 start
> node index.js

Application listening on port 3000
Great, we’ve got a running application. For more information about what each of the flags are doing here, check out the docker run documentation here.
Picking a smaller base image
Let’s examine our image. We can see the overall size of the application.
$ docker image ls
REPOSITORY        TAG       IMAGE ID       CREATED        SIZE
docker_tutorial   latest    c281de3a5e17   37 hours ago   912MB
Wow, 912MB, that’s enormous. Most of the bloat is happening because we’re using the full NodeJS base image, with the version tag. When you use the NodeJS image, you’re getting along an entire operating system along with it—Debian to be exact—including all of the operating system files that Debian ships with. Often times, you won’t need all of those different files.
There are two alternatives we can use: node:<version>-alpine and node:<version>-slim.
What’s the difference? In short, the alpine images are based off of the alpine Linux distribution and are very small, but don’t have all of the packages we might need to run our projects. We’ll have to install them separately if we use alpine. Think of things like git, curl, and so forth.
The other syntax is for specifying different releases of the Debian operating system, which is what the NodeJS image is based on. They generally have funny sounding names, like “buster” or “bullseye.” We can also add the “slim” keyword to those images to indicate that we want a slimmed down version of the OS.
We’re going to go with Alpine Linux. You can see the exact image file that we’re going to be “layering” on top of on Github (this is one of the official NodeJS docker images). Let’s modify our Dockerfile.
FROM node:16.0.0-alpine3.11
WORKDIR /app
COPY . .
RUN npm install
CMD ["npm", "start"]
Next, rebuild the image.
$ docker build -t  .
$ docker image ls
REPOSITORY          TAG       IMAGE ID       CREATED          SIZE
docker_tutorial     latest    04c242851618   15 minutes ago   117MB
Check out the difference, our new image is only 117MB. That’s a huuuuugue difference!
But what about packages we need?
What happens if we need to use a utility that’s not installed? For instance, if we start up our container and attach to it, we’ll see that the curl utility is not working.
The exec command let’s us attach to a running container, and can be paired with a shell (in this case the /bin/sh shell) to let us run commands from inside the running container. Make sure you allow interactivity with the container by passing the -dit flags at startup.
$ docker run -dit --rm docker_tutorial
1e921f0edc3de7f7027f3b1d11501590dac37f48fac852d23c1c09e44e4f9bcc
$ docker exec -it 1e921 /bin/sh
$ /app # curl
/bin/sh: curl: not found
$ /app exit
As you can see, the curl binary is not installed with Alpine Linux by default. No problem, we can just add it during our build steps. Alpine Linux uses the apk package manager (which stands for Alpine package management, surprise surprise). Let’s modify our Dockerfile again.
FROM node:16.0.0-alpine3.11
WORKDIR /app
COPY . .
RUN npm install
RUN apk add --no-cache curl
CMD ["npm", "start"]
You know the drill: rebuild the image, and restart the container. You’ll notice now that the curl command will work when we use it inside of the container.
Adding a .dockerignore file
If you have files on your local machine that you’re only using in development, or files that contain sensitive data that you don’t want to send over to the server, you would add these to your .dockerignore file. To fully understand why this is important, let’s take a look at the third line of our Dockerfile.
FROM node:16.0.0-alpine3.11
WORKDIR /app
COPY . .
RUN npm install
RUN apk add --no-cache curl
CMD ["npm", "start"]
The Docker build process is fundamentally a server-client relationship: We run commands using the docker client on our local machine, which communicates with the docker server, also known as the docker daemon. When building an image, the docker client archives the build context into a .tar file and sends that archive to the server, which unpacks the archive and uses its contents.
We can use a .dockerignore file to tell the Docker client to avoid bundling up certain files from the build context, which saves bandwith and reduces the amount of time it takes to communicate with the server. This will also reduce our image size, because unncessary files aren’t included in the container.
It also helps with cache invalidation. If we fail to ignore certain files from our build context, then every time there is a change in those files, the build process will have to re-recreate a new image layer. This is particularly problematic if we have an ever-changing node_modules directory.
The build context is generally the current directory:
docker build -t docker_tutorial . # The build context is the "."What about our project? Our dockerfile is copying the node_modules directory, which we do not need to send to the engine, because we’re re-building it at a later step in our Dockerfile. Let’s create a .dockerignore file and tell Docker to ignore the directory. The syntax is similar to the .gitignore syntax.
node_modules/Now when we build this image, the “build context” will not include our local node_modules folder, and Docker will install its own, speeding up the process.
To further demonstrate the point, create a dummy file that’s 5GB in size into the build context, and rebuild the image. Notice how much longer this process takes, because Docker is zipping up this file every time and sending it to the server.
$ docker rmi docker_tutorial
$ mkfile -n 5g dummy-file     # mkfile is a MacOS utility
$ docker build -t docker_tutorial .
[+] Building 18.8s (9/9) FINISHED
 => [internal] load build definition from Dockerfile                        0.0s
 => => transferring dockerfile: 36B                                         0.0s
 => [internal] load .dockerignore                                           0.0s
 => => transferring context: 54B                                            0.0s
 => [internal] load metadata for docker.io/library/node:16.0.0-alpine3.11   0.5s
 => [1/4] FROM docker.io/library/node:16.0.0-alpine3.11@sha256:843cf39...   0.0s
 => [internal] load build context                                           11.3s
 => => transferring context: 524.42MB                                       11.3s
 => CACHED [2/4] WORKDIR /app                                               0.0s
 => [3/4] COPY . .                                                          1.3s
 => [4/4] RUN npm install                                                   3.1s
 => exporting to image                                                      2.4s
 => => exporting layers                                                     2.4s
 => => writing image sha256:196173...                                       0.0s
 => => naming to docker.io/library/docker_tutorial:latest                      0.0s
As you can see, the docker client is taking a long time to transfer this large file to the docker server. Our acutal image is also enormous, despite the fact that we’re not using this file.
$ docker image ls
REPOSITORY        TAG       IMAGE ID       CREATED         SIZE
docker_tutorial   latest    1457d1a0999e   4 seconds ago   655MB
If we ignore this large file in our .dockerignore file, we can dramatically speed up our build time, reduce our image size, and prevent accidental cache busting in the future if this large unused file is changed locally.
Multi-stage builds
You’ll see a lot of outdated tutorials online that recommend stringing together multiple RUN commands when making your Dockerfile. The reasoning is sound: every time you use this command, the docker build process will create a new layer on your filesystem. Docker does this because each layer in your container is read only, and in order to make changes, Docker has to copy over the files from the previous layer.
Let’s think of a simple example: In one command, you download some source code for a project dependency, extract, and compile it. Then in another step, you delete the .tgz file so that it’s not cluttering up your base image. The problem with this solution is that the .tgz file will still exist in the previous layer.
In the past, you could string together multiple RUN commands into a single bash command, to avoid layer duplication.
As the Docker documentation states: “This is failure-prone and hard to maintain. It’s easy to insert another command and forget to continue the line using the \ character, for example.”
The more modern solution is to use multi-stage builds.
Again, pulling directly from the documentation: “With multi-stage builds, you use multiple FROM statements in your Dockerfile. Each FROM instruction can use a different base, and each of them begins a new stage of the build. You can selectively copy artifacts from one stage to another, leaving behind everything you don’t want in the final image.”
If we needed a larger base image for the actual build step in our NodeJS application, the process would look something like this:
# Build layer
FROM node:16.0.0 AS builder
WORKDIR /app
COPY . .
RUN npm ci --only=production

## Production layer
FROM node:16.0.0-alpine3.11
WORKDIR /app
COPY --from=builder /app .
CMD ["index.js"]
This is kind of pointless for our current project, because we don’t need the full NodeJS base image. But you can imagine other scenarios (imagine you need other utilities not available in Alpine Linux for your build steps) where this would be useful.
Does that mean we’re at the end of the line? Can we optimize further? Our bundle size is still 128MB…
Base Alpine Image
When we use the node:16.0.0-alpine3.11 as our base image, there is still some extra content installed that we don’t need. Running container-diff, which is an open source container comparison tool from Google, we can see that the base Alpine Linux NodeJS image include some extra content that we technically don’t need for our application, such as yarn, and even (gasp) npm.
Let’s try manually starting from a bare-bones Alpine layer (~5MB) and just adding NodeJS ourselves.
# Build layer
FROM node:16.0.0 AS builder
WORKDIR /app
COPY . .
RUN npm ci --only=production

## Production layer
FROM alpine
WORKDIR /app
COPY --from=builder /app .
RUN apk add --update nodejs
CMD ["node", "index.js"]
The size of the image, if we rebuild it, is now only 49.4MB! And diving into the layers themselves, we’ll see that the bulk of that is coming from NodeJS itself.
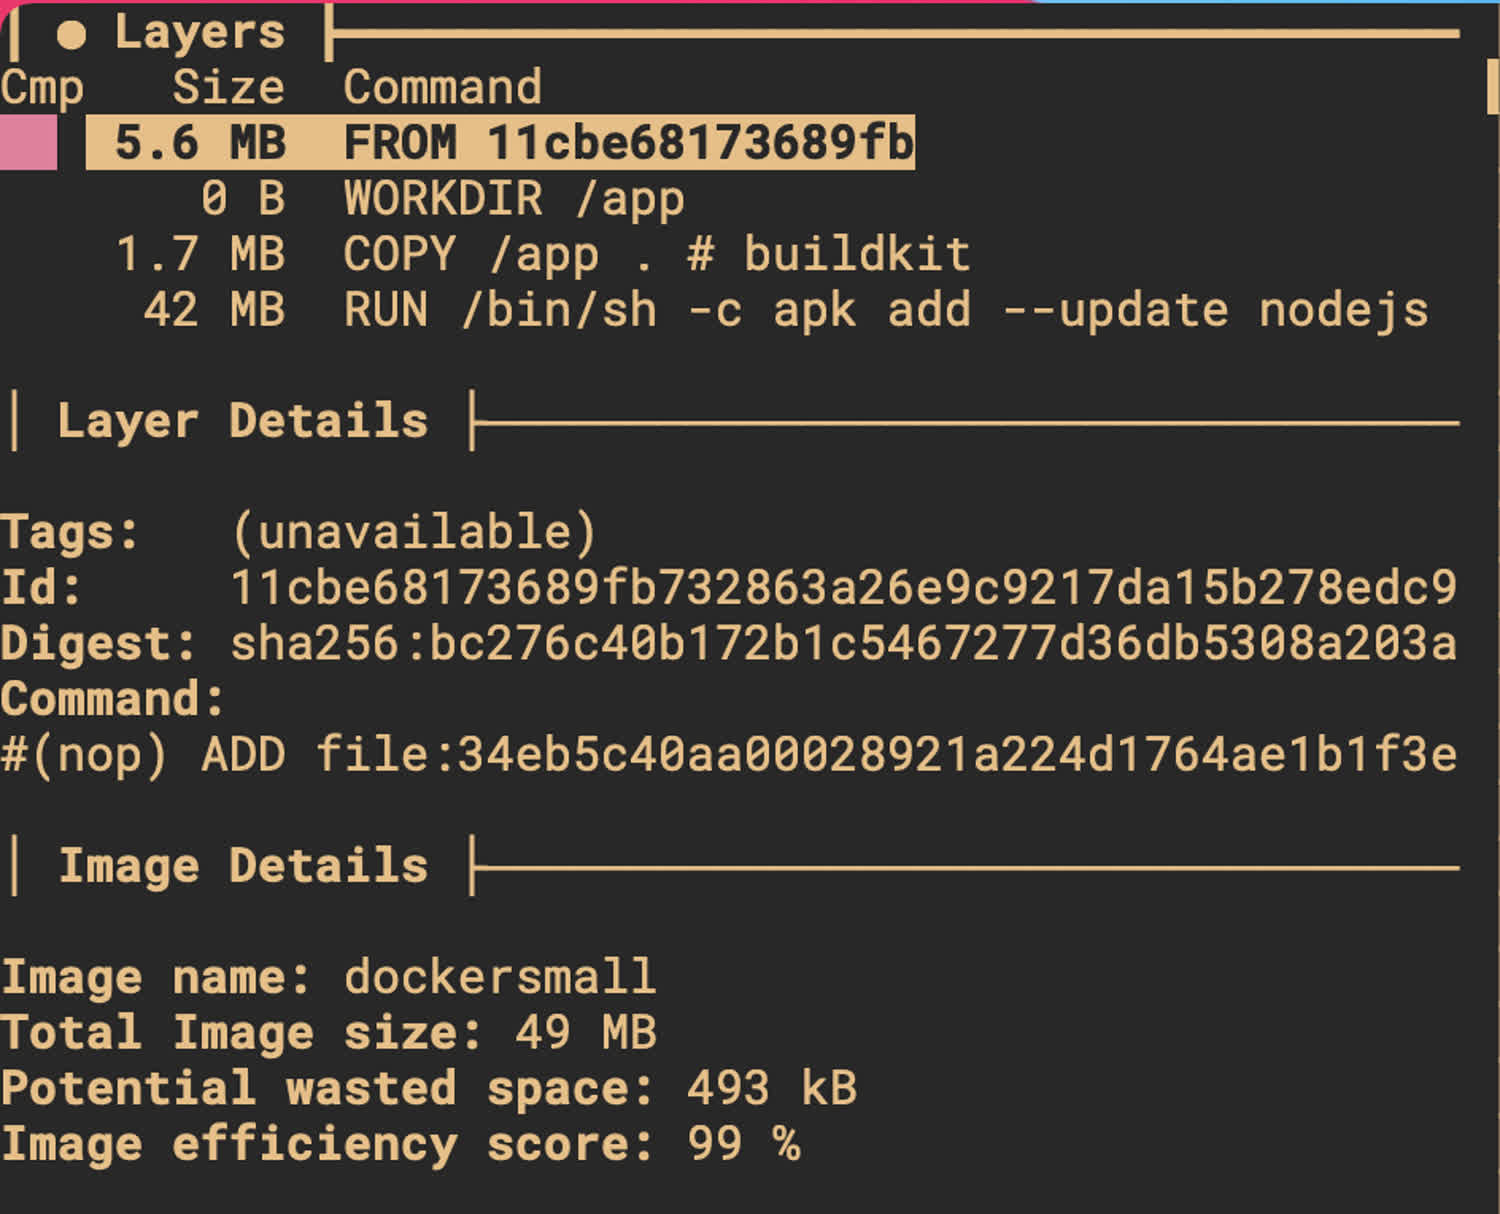
This container is under 50MB and the bulk of that is coming from NodeJS itself.
This is pretty much as small as your NodeJS container is going to get, unless you start picking apart the NodeJS runtime itself.
Now, are there other steps we can take to make this container more secure?
Avoid running as root
Currently, our container is running as root, which is generally a bad idea. Notice that if we connect to our current container, we’re running as root.
$ docker ps
CONTAINER ID   IMAGE          COMMAND                  CREATED          STATUS          PORTS     NAMES
f0d7b3b9b190   docker_tutorial   "node index.js"          58 seconds ago   Up 57 seconds             laughing_galileo
$ docker exec -it f0d
$ /app # whoami
root
/app # exit
Let’s create a new user called “prod” and a new group called “app” that we can use to run our application, so that if someone compromises our container, they won’t have root access to all of our secrets. We can fix that by adding a user to our dockerfile.
# Build layer
FROM node:16.0.0 AS builder
WORKDIR /app
COPY . .
RUN npm ci --only=production

## Production layer
FROM alpine
WORKDIR /app
COPY --from=builder /app .
RUN apk add --update nodejs
RUN addgroup -S app && adduser -S prod -G app
USER prod
CMD ["node", "index.js"]
Rebuild the image and run it, and notice that we’re now running as the user “prod,” instead of root.
$ docker ps
CONTAINER ID   IMAGE             COMMAND                  CREATED          STATUS          PORTS     NAMES
8s9sdj92ye01   docker_tutorial   "node index.js"          30 seconds ago   Up 57 seconds             laughing_galileo
$ docker exec -it 8s9
$ /app # whoami
prod
/app # exit
Another option: “distroless”
Another option for locking down your container is to use a “distroless” base image. These images generally aren’t quite as light as the Alpine Linux, but they have a security advantage: They don’t come with package managers and shells, which reduces the attack surface for malicious actors.
Since these containers do not contain a shell, the ENTRYPOINT command must be in vector format (aka, a single entry). It also means that we cannot connect to these containers the same way we’ve been connecting to our Alpine Linux containers because they do not have a shell for us to use. Here’s what our application might look like rewritten with this format.
# Build layer
FROM node:16.0.0-alpine3.11 AS builder
WORKDIR /app
COPY . .
RUN npm ci --only=production

# Prod layer
FROM gcr.io/distroless/nodejs:14
COPY --from=builder /app .
CMD ["index.js"]
Let’s build this image and run it.
$ docker build -t dockersmall:distroless .
$ docker ps
REPOSITORY     TAG          IMAGE ID       CREATED             SIZE
dockersmall    distroless   1def4589f14e   2 minutes ago       123MB
$ docker run -dit --rm dockersmall:distroless
ad586cf90635b27b97fb88c43c1134cd4c4f96d8db76dce9ff4a2fbff55293e6
Now, if we try to run a command that attaches to this container, it will fail. That’s because the binary for the shell doesn’t exist inside the container.
$ docker exec -it ad586c /bin/sh
OCI runtime exec failed: exec failed: container_linux.go:380: starting container process caused: exec: "/bin/sh": stat /bin/sh: no such file or directory: unknown
There are some disadvantages to distroless containers however, which have generally kept me from adopting them over Alpine Linux. The lack of shell access makes debugging and logging harder. It’s also more difficult to install packages, because the distroless images don’t have apt-get, apk, or any other package manager built in. Instead, you must copy over the binaries inside the Dockerfile.
Don’t take my word for it though. Play around with different distributions and see what works best for you and your team.