

I’ve been using Neovim as my primary editor for about three years. In that span, the editor and community surrounding the tool has undergone a dizzying amount of change. People moved onto Lua, the core team integrated LSPs directly into the editor, and the plugin ecosystem exploded. Much like the ever-changing frontend world, it can be hard to keep up with the latest and greatest with Neovim core, let alone the plugin ecosystem.
This post is by no means an exhaustive “how to” for setting up debuggers, LSPs, linters, or other tools. Rather, I hope this post gives inspiration to others building their configurations. The post is based on my own, which can be found on my Github here.
If you’ve got ideas on how I can improve my own workflow or ideas about what to cover next, please drop a comment below!
Lua Modules
This isn’t Neovim specific, but I think it’s important to make sure we understand Lua modules before going any further. They’re at the heart of most Neovim configurations and modern plugins.
When Neovim first loads it’ll pick up your init.lua located in your standard path, for me ~/.config/nvim. If you aren’t sure where this is, run the following Ex-command:
:lua print(vim.fn.stdpath('config'))I prefer to keep this initial file as simple as possible. My init.lua just loads another series of modules that contain different parts of my configuration:
-- Neovim Core Settings
require("settings")

-- Language Servers
require("lsp")

-- Settings, Mappings, Keybindings
require("colorscheme")
require("functions")
require("autocommands")
require("commands")

-- Plugins
require("plugins")

-- Mappings
require("mappings")
When resolving these imports, Lua will automatically look for a lua directory in your config path. If it cannot find a file, it’ll look for a directory with an init.lua inside it (if you’re familiar with JavaScript, this is equivalent to the an index.js resolution).
For instance, my folder structure (basically) looks like this:
$ pwd
~/.config/nvim
$ ls
lua
after
init.lua
plugin
$ cd lua
$ ls -la
drwxr-xr-x  10 harrisoncramer  staff   320 Dec  3 12:16 .
drwxr-xr-x  17 harrisoncramer  staff   544 Dec  5 22:20 ..
-rw-r--r--   1 harrisoncramer  staff   481 Nov 19 21:18 autocommands.lua
-rw-r--r--   1 harrisoncramer  staff  2026 Nov 19 21:18 colorscheme.lua
-rw-r--r--   1 harrisoncramer  staff  3268 Dec  3 12:16 commands.lua
drwxr-xr-x   4 harrisoncramer  staff   128 Dec  3 12:18 functions
drwxr-xr-x   6 harrisoncramer  staff   192 Dec  3 12:16 lsp
-rw-r--r--   1 harrisoncramer  staff  2506 Nov 19 21:18 mappings.lua
drwxr-xr-x  26 harrisoncramer  staff   832 Dec  6 22:34 plugins
-rw-r--r--   1 harrisoncramer  staff  2118 Nov 19 21:18 settings.lua
This isn’t a full tour of Neovim, so I won’t go into every folder and file here, but one common point of confusion worth clarifying: the plugin folder here is the output of my Packer plugin manager compiling all of my plugins into a single file. I’m not manually editing the plugin/packer_compiled.lua file (we’ll get into plugins in a second).
In some cases, I’m using folders to further break down a given module. For instance, the lsp folder contains an init.lua file that also imports other files, and so forth.
Due to the way Lua’s require call works, your Neovim configuration will error if it cannot find the import it’s looking for, and the rest of your configuration will break.
This is super important to understand! Don’t skip this part!
Most of the time you want to handle these failed require calls gracefully. Fortunately, Lua provides us with a function that we can wrap around require calls, called pcall, in order to protect the rest of the code, like this:
local mason_status_ok, _ = pcall(require, "mason")
local mason_lspconfig_ok, mason_lspconfig = pcall(require, "mason-lspconfig")

if not (mason_status_ok and mason_lspconfig_ok) then
  print("Mason, Mason LSP Config, Completion, or LSP Format not installed!")
  return
end
Here, I’m just printing and returning from a module if the required dependencies aren’t installed.
In order to return something out of a module, like variables or methods, you can just return a Lua table. For instance, we could require a file foo.lua which just returns a table with the bar value defined inside of it:
return {
    bar = "Hello, World"
}
Then in the calling code, we could access foo.bar as a variable. You don’t have to return a table out of a module, the code inside of the file will be called regardless of whether or not you return anything. For instance, my mappings.lua and settings.lua files do not return anything, they merely set editor configuration and key mappings.
Plugin Installation
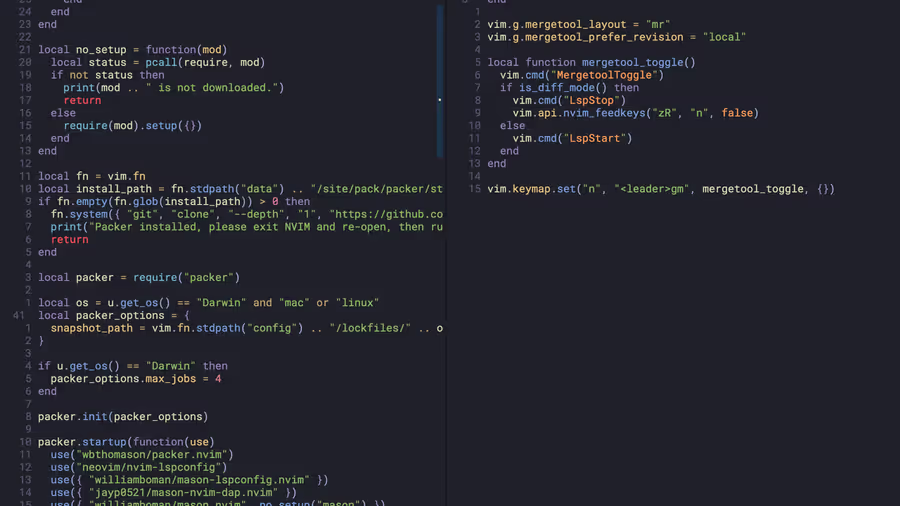
I’m currently using Packer to manage my plugins. On startup, my init.lua loads in all of my plugins (and sets up packer) by sourcing a module at ~/.config/nvim/lua/plugins/init.lua.
I’ve recently switched to nvim.lazy for plugin management and no longer use the below functions.
The instructions for Packer are pretty straightforward, you basically just list the plugins you want installed and they’re installed for you when you run :PackerSync. The only custom part of my configuration here is the following helper functions:
-- If the plugin is in lua, require it (otherwise I'll provide nil for the remote).
-- After requiring the plugin, attempt to load my configuration for it.
local custom = function(remote, config)
  if remote == nil then -- The plugin does not need to be required.
    local local_config_ok = pcall(require, config)
    if not local_config_ok then
      print(config .. " is not a configuration file.")
      return
    end
  else -- Require both the plugin and my configuration
    local status = pcall(require, remote)
    if not status then
      print(remote .. " is not downloaded.")
      return
    end
    local local_config_ok = pcall(require, config)
    if not local_config_ok then
      print(remote .. " is not configured.")
    end
  end
end

-- Simply requires the module and calls it's setup method, if it exists
local default = function(mod)
  local status, m = pcall(require, mod)
  if not status then
    print(mod .. " is not downloaded.")
    return
  else
    if type(m.setup) == "function" then
      m.setup()
    end
  end
end
These are then passed to the setup in Packer, like this:
...
packer.startup(function(use)
  use({ "kevinhwang91/nvim-bqf", requires = "junegunn/fzf.vim", config = custom("bqf", "plugins.bqf") })
  use({ "numToStr/Comment.nvim", config = default("Comment") })
...
Packer will automatically call the callback provided to the config key when it sets up the plugin. The default function simply requires the given plugin (or shows a message warning that it is missing) and then calls it’s setup method, without any configuration if it exists. It’s become a convention for Neovim plugins to have a .setup() method attached to the main module.
The custom function requires the module, and then requires my own configuration for that plugin, which is stored in a separate file. For instance, I have a file at ~/.config/nvim/lua/plugins/bqf.lua which contains all of my configuration for that plugin.
These two functions let me easily keep all of my configuration or mappings for a specific plugin in a single file, and avoid repeitive boilerplate inside of the plugins/init.lua which is simply responsible for loading in the modules.
Search
For project-wide, intelligent fuzzy search, the best plugin in Neovim is Telescope, hands-down. Not only does Telescope provide you with the ability to search for files and folders, it’s API is extremely well designed and lets you build your own custom pickers, if you want to.
Telescope is merely a browser of lists, and you can have it sort through anything you want. I use it for the following:
- Search for files
- Search for text
- Search for text in a folder
- Create, edit, and delete files and folders
- Filter and search git stashes
- Search through git history
- Much more!
For instance, I have the following user-defined :Stash ex-command that creates a stash for my current changes, named after the current branch:
vim.api.nvim_create_user_command("Stash", function(opts)
  local name = opts.args ~= "" and opts.args or u.get_date_time()
  name = string.gsub(name, "%s+", "_")
  vim.fn.system("git stash -u -m " .. name)
  require("notify")(string.format("Stashed %s", name))
end, { nargs = "?" })
Then within Telescope, I can easily scroll through branch-specific stashes for the current branch and apply them. Here’s what the function looks like:
local actions = require("telescope.actions")
local finders = require("telescope.finders")
local conf = require("telescope.config").values
local previewers = require("telescope.previewers")
local pickers = require("telescope.pickers")

local stash_filter = function()
	local opts = { show_branch = false }
	opts.show_branch = vim.F.if_nil(opts.show_branch, true)
	opts.entry_maker = vim.F.if_nil(opts.entry_maker, make_entry.gen_from_git_stash(opts))

	pickers.new(opts, {
		prompt_title = "Git Stash",
		finder = finders.new_oneshot_job({ "git", "--no-pager", "stash", "list" }, opts),
		previewer = previewers.git_stash_diff.new(opts),
		sorter = conf.file_sorter(opts),
		attach_mappings = function()
			actions.select_default:replace(actions.git_apply_stash)
			return true
		end,
	}):find()
end
Going through all of the specifics of how to configure and use Telescope is beyond the socpe of this post, especially given that it has it’s own plugins which can be configured. But highly recommend checking it out if you’re using bare FZF, AG, RG, or another searching tool. My configuration for Telescope is part of my dotfiles on Github.
Testing
I’ve gone through a series of different test runners with Neovim, and ultimately landed on Neotest. The tool lets you run tests within the browser directly and gives you amazing jump-to-error support. For instance, within a Vitest file, I can run the file under my cursor with a user-defined hotkey, and see the output both as virtual text within the editor and via a popup in the sidebar.
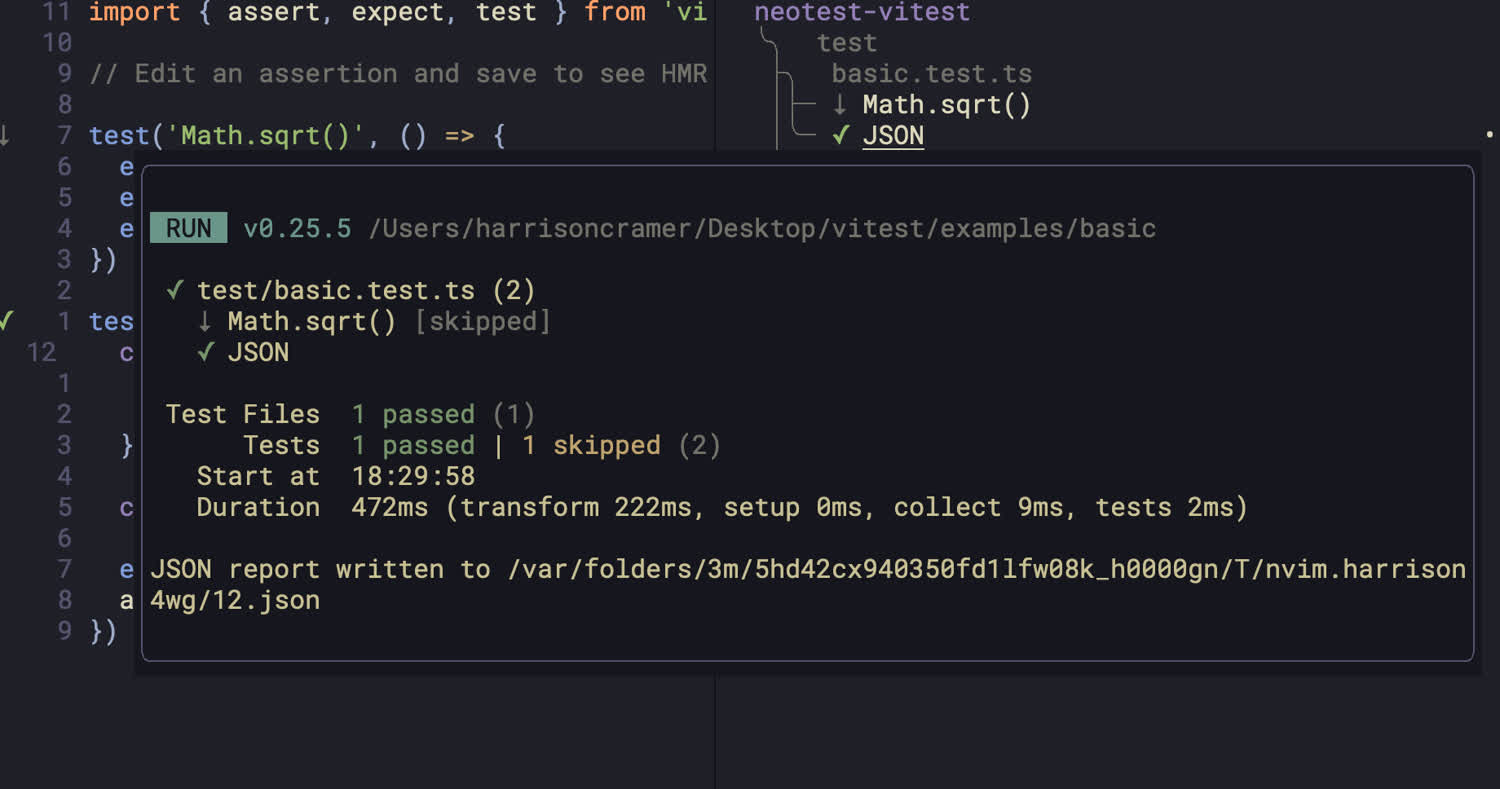
The output of the process is also directly available within the editor, which is super nice if you want to see why a test failed or other logging information.
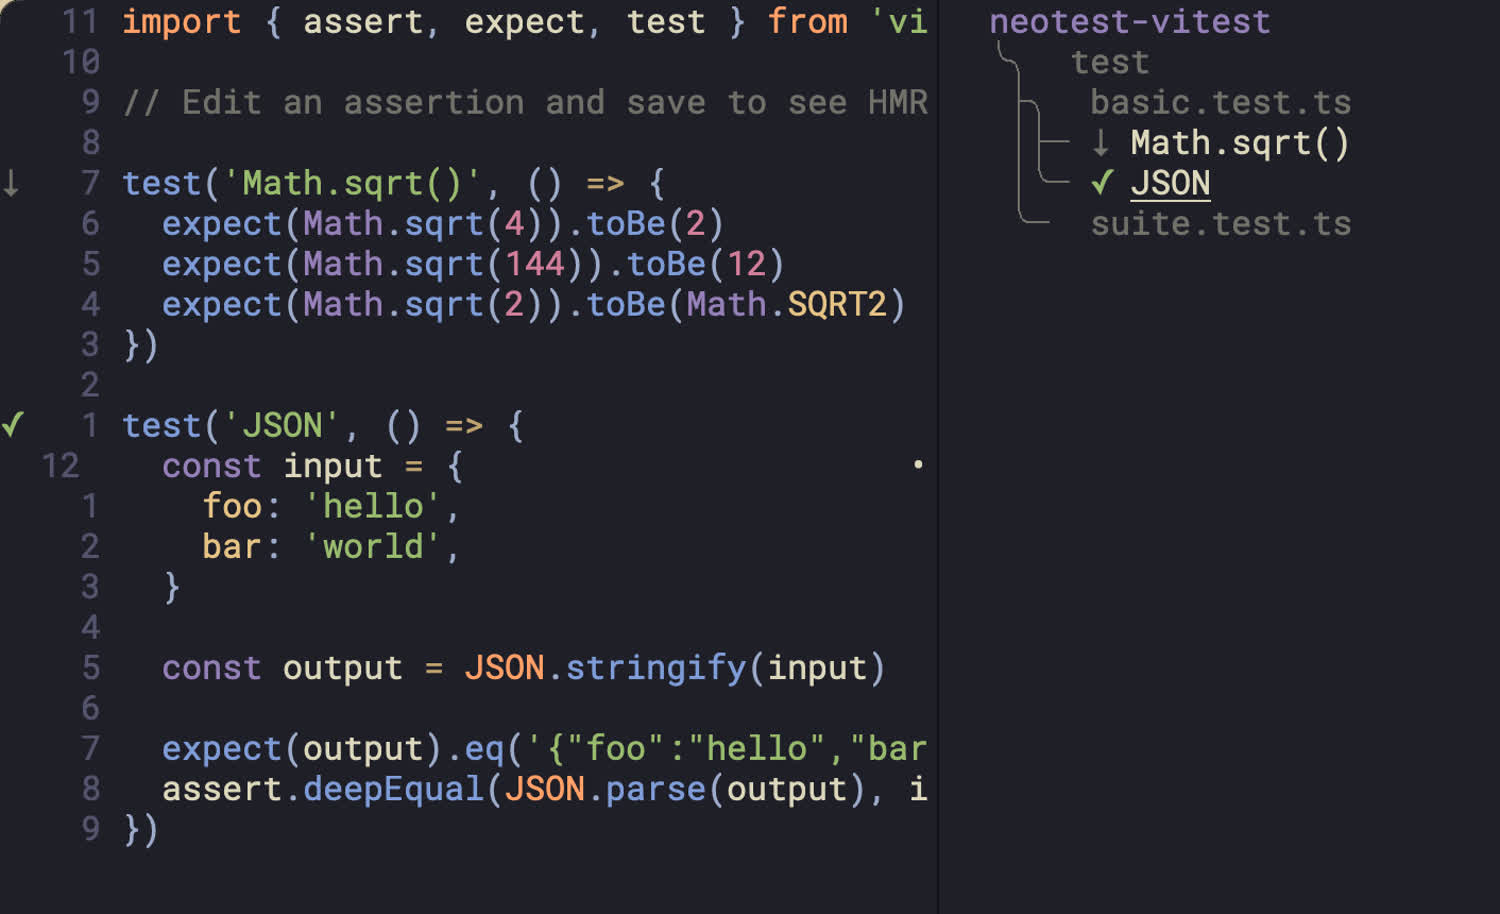
There are of course times where you’ll want to split your test runner into a separate terminal. But I’ve largely found that Neotest gives me the ability to target specific tests more easily, track output, view error messages, and everything else that I need without context switching from the editor. My configuration for Neotest is is also part of my dotfiles on Github.
Git
Since it’s at the heart of any software engineer’s workflow, tight integrations with Git is super important. I’m currently using several different plugins and mappings to handle git-related functionality. This is because I’m pretty picky when it comes to git workflows, and I’ve not found one plugin that handles all of these different things elegantly.
The first and probably most essential Git plugin is Fugitive. This plugin provides a number of useful utilities that let you interact with your git repository without leaving Neovim. I’m primarily using the :Git ex-command to pull up a quick view of the changed, deleted, and added files in a given repository. The status window lets you commit files, view an inline-diff for changes, and make commit messages.
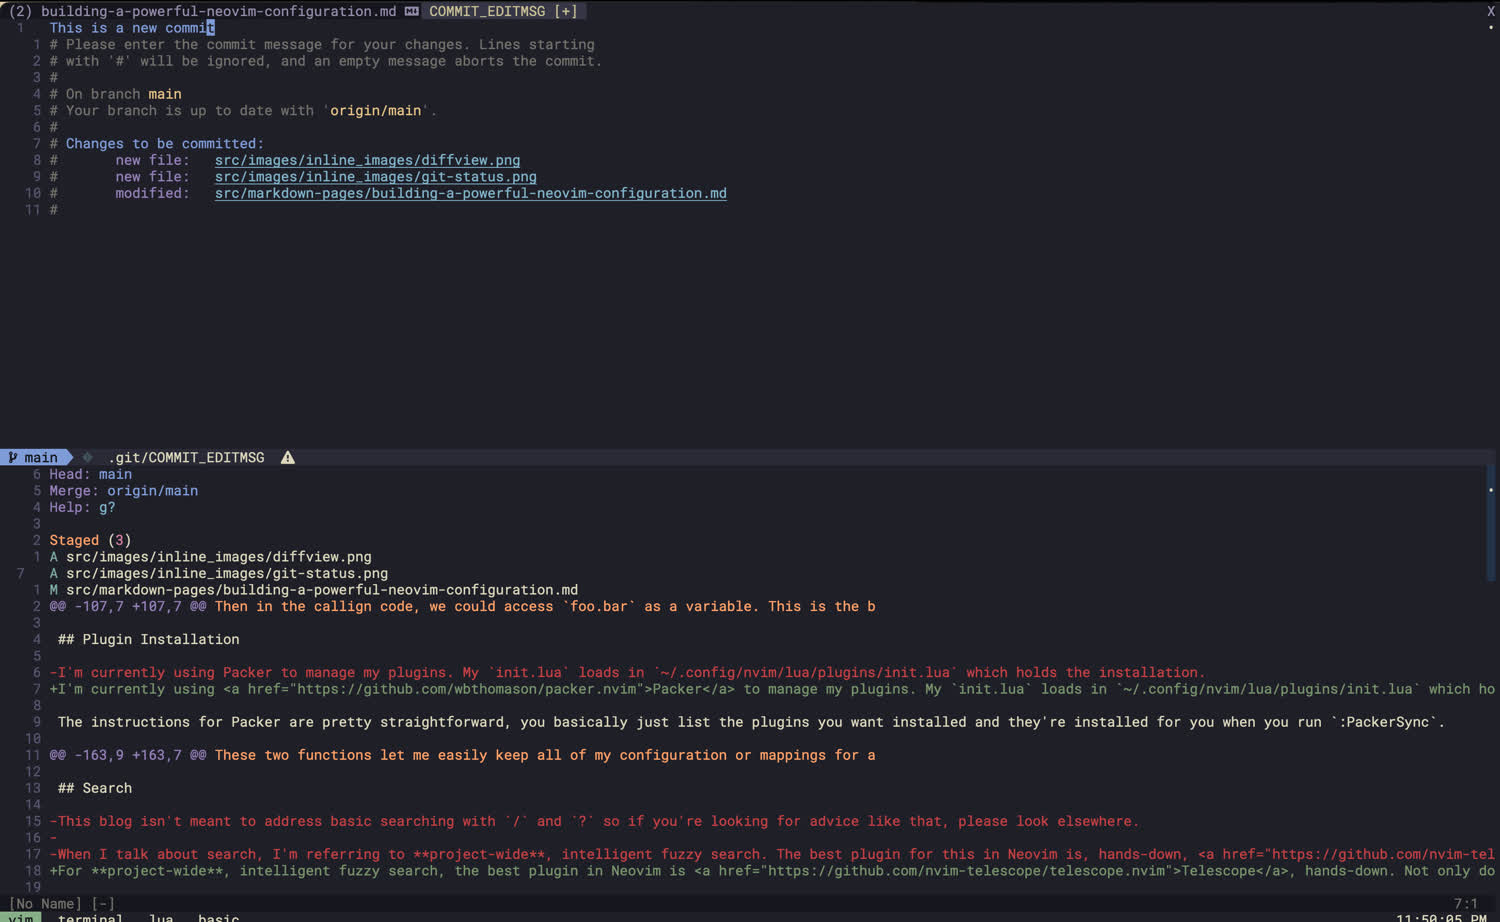
You can add files, change commit messages, and more from within the status window.
Fugitive also gives a variety of other super useful commands that let you interact with the history of your repository. The most useful for me are :Gedit and :Gread commands which, respectively, open up the specified file (the :Gedit develop:% command opens a buffer of the current filename on the develop branch) or read a file (the :Gread command by itself restores the file to it’s unmodified state on the current commit). These are super powerful when combined with Neovim’s % symbol, which represents the current buffer. For instance, if you’re in file foo.js, the command :Gedit 30dks91:% will open up foo.js in new buffer as it existed at the 30dks91 commit.
Another helpful command is the :Gvdiffsplit command, which lets you see the difference between the current buffer and the same file at some point in the past. For instance, :Gvdiffsplit HEAD~1:% lets you see the difference between the current file and one commit back.
Generally speaking, however, when it comes to surfing the git history of a given repository, I prefer to use diffview.nvim, which provides a nicer interface.
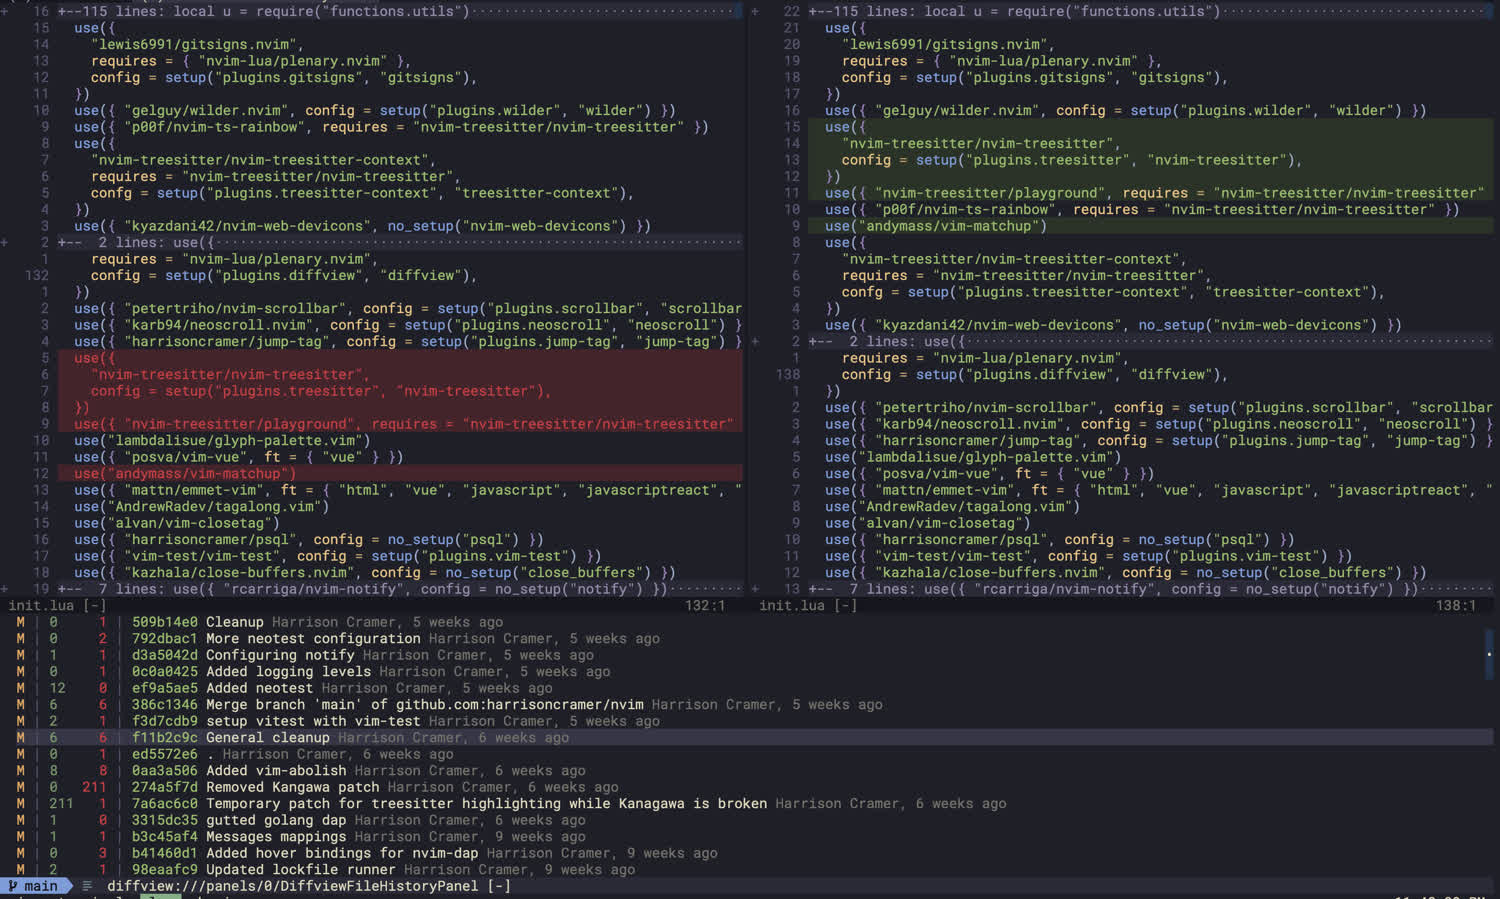
Diffview provides a great interface for browsing through your git history. It even has a built-in merge conflict tool.
The third plugin that I consider essential to my git workflow is gitsigns.nvim, which provides git integrations within a single file.
For instance, you can use this tool to do hunk-wise staging of changes, and to see what has changed at a given point in a file without opening up another status window. Combined together, these three plugins let me pretty much stay in my editor all the time. The only time I’m ever really leaving for git is to rebase, or to do a bisect.
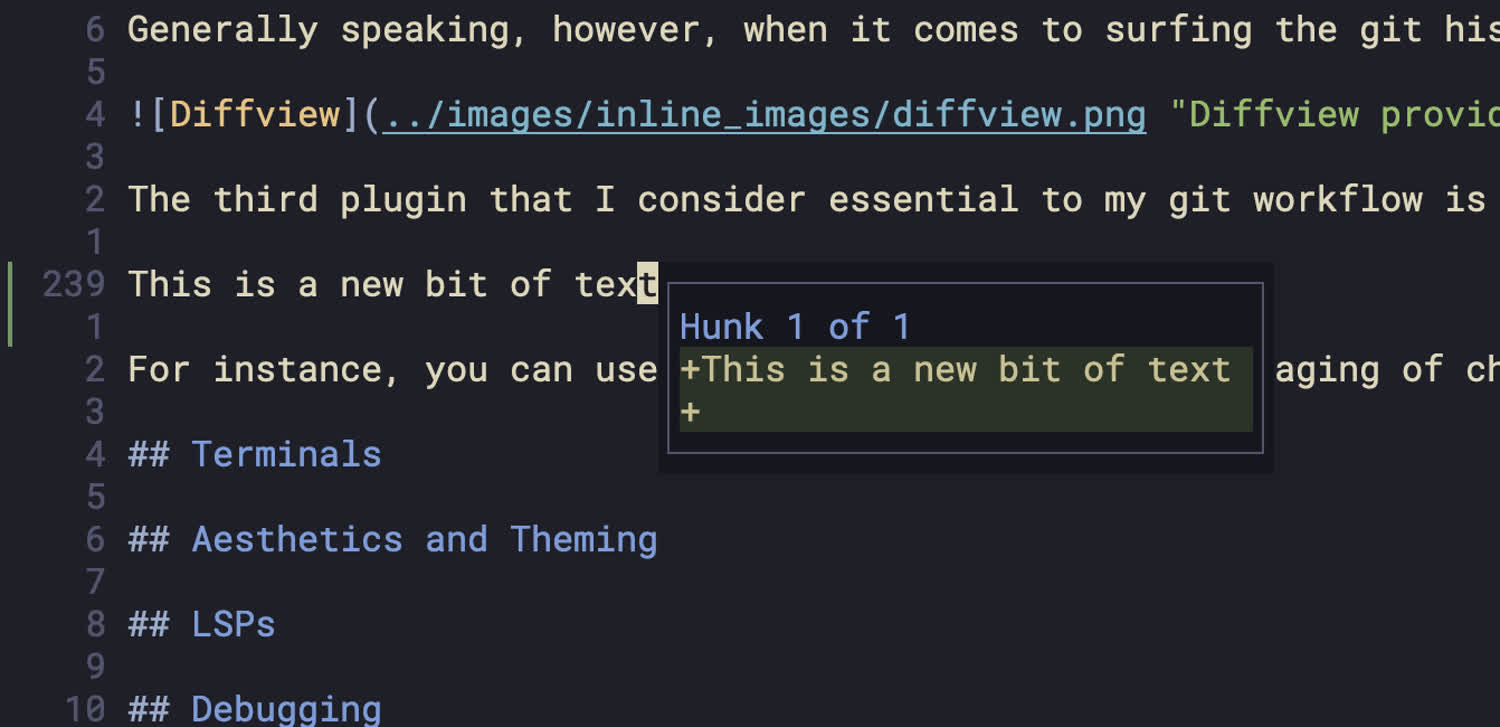
Gitsigns lets you see diffs on a line-by-line basis as you edit a file, and add specific hunks directly within a buffer.
It also places helpful hints in the current buffer’s gutter (the blank space on the far left of a buffer) that indicate whether a line has been changed or modified. Super helpful.
Theming
Personally, I’m not into the whole “ricing” of Linux setups, although I do appreciate a clean configuration. For me, it’s more about utility — what colors, fonts, icons, and so forth will give me additional context or information, without being too distracting?
To that end, I’ve unified the colorscheme across my entire development environment — Alacritty, Tmux, and Neovim — to use the Kanagawa colorscheme. The repository has an Alacritty configuration file which is works great.
Like most good colorshemes, Kanagawa integrates directly with Treesitter, an absolute must for any Neovim configuration. Back in the bad old days, Vim and Neovim used to rely on complicated regular expressions to parse buffers and apply syntax highlighting. That’s no longer necessary thanks to tools like Treesitter, which parse the file into an abstract syntax tree and apply highlighting from there. This also gives you fine-grained control over which colors to use. For instance, I work a lot in VueJS, and have defined a few different highlight groups to work with Treesitter tags:
local colorMap = {
  sumiInk3      = "#363646",
  sumiInk4      = "#54546D",
  waveBlue1     = "#223249",
  ...
  katanaGray    = "#717C7C"
}
vim.api.nvim_set_hl(0, "@tag", { fg = colorMap.lightBlue })
vim.api.nvim_set_hl(0, "@tag.delimiter", { fg = colorMap.lightBlue, })
vim.api.nvim_set_hl(0, "@tag.attribute", { fg = colorMap.sakuraPink })
The color map is taken from Kanagawa’s github page. To make your own overrides, you can run the ex-command :TSHighlightCapturesUnderCursor which will tell you which capture group you’re currently hovering over. You can also install treesitter playground to look at the AST for a given buffer.
Chances are, if you’re using Neovim as your primary development tool, you’re also using other terminal tools. Beyond color schemes, it’s also important to have a font that can support all sorts of symbols. I’m using Hack Nerd Font, but most nerd fonts will work. This is not a Neovim configuration but worth mentioning here (for me, I set these in my Alacritty config).
Terminals
Sometimes you need to leave Neovim. I’ve got two approaches to this. Primarily, I’m using tmux to keep open several windows, with Neovim open in one of them.
Often, though, the terminal command that I need is very small (like an ls or grep or something like that). In those cases, I use FTerm.nvim. It’s a simple terminal toggle that you can switch open/closed when you need it. No frills, gets the job done.
A terminal theming tool that I’d recommend is powerlevel10k, a ZSH theme that lets you get git status information, AWS environment information, and other goodies in your shell. Finally, I’m using Tmux. I’ve tried a few different configuration tools but have opted to just roll my own. It’s quite simple, and it’s on my dotfiles on Github.
LSPs
Setting up language servers can be quite challenging, if you’re new to the Neovim space.
The important thing to understand at the outset: Neovim does not have debuggers, language servers, or formatters built in. In order to use these tools, you have to install them separately and tell Neovim how to connect to them. This is a fundamentally different approach from other editors, like VSCode, where most of these things are installed and configured out of the box with the editor.
The language server protocol was built to standardize the way that different language servers communicate diagnostic information, type definitions, and other language metatdata to clients (often editors). This standardization makes it easier to connect Neovim to a variety of different language servers that are all implementing the same protocol.
Say you want to run a language server to give you autocomplete suggestions for a Go codebase. Not only do you need to install the Golang language server (likely a separate binary, which will run as an independent process). You also need to set up Neovim so that it can communicate with that server, using the LSP, or Language Server Protocol.
If this is your first time setting up an LSP, please look elsewhere. This is not meant to be an exhaustive guide on how to set up an LSP.
Just a few years ago, the installation of these language servers was tedious, and you had to individually install them, keep them up-to-date, ensure they were in your path, and so forth. Fortunately, this is now much easier with Mason, a plugin that lets you “easily install and manage LSP servers, DAP servers, linters, and formatters.”
I’m taking advantage of Mason and mason-lspconfig.nvim, a helper plugin, to automatically install the LSPs that I want and the debuggers that I want:
local mason_status_ok, _ = pcall(require, "mason")
local mason_lspconfig_ok, mason_lspconfig = pcall(require, "mason-lspconfig")

if not (mason_status_ok and mason_lspconfig_ok) then
  print("Mason, Mason LSP Config, Completion, or LSP Format not installed!")
  return
end

local servers = {
  "sumneko_lua",
  "clojure_lsp",
  "tailwindcss",
  "tsserver",
  "eslint",
  "gopls",
  "volar",
}

mason_lspconfig.setup({ ensure_installed = servers, automatic_installation = true })
When Neovim starts up, once you’ve installed Mason (using :PackerSync for instance) this code will automatically install the LSPs for these languages. Awesome! For each of those language servers, I want the ability to customize how they behave once Neovim (the client) has attached to them.
You can do this by providing an on_attach callback. I’ve written my on_attach callback, and for each of the servers specified above, I’m requiring another lua module located at ~/.config/nvim/lua/lsp/servers/x, where x is the server name, and calling it’s setup function, passing along the on_attach callback.
local on_attach = function(client, bufnr)
  local function buf_set_option(...)
    vim.api.nvim_buf_set_option(bufnr, ...)
  end

  vim.keymap.set("n", "gd", vim.lsp.buf.definition, {})
  vim.keymap.set("n", "K", vim.lsp.buf.hover, {})
  vim.keymap.set("n", "gi", vim.lsp.buf.implementation, {})
  vim.keymap.set("n", "gt", vim.lsp.buf.type_definition, {})
  vim.keymap.set("n", "<C-k>", vim.lsp.buf.signature_help)
  vim.keymap.set("n", "<leader>r", vim.lsp.buf.rename, {})
end

local normal_capabilities = vim.lsp.protocol.make_client_capabilities()
local capabilities = cmp_nvim_lsp.default_capabilities(normal_capabilities)

for _, s in pairs(servers) do
  local server_config_ok, mod = pcall(require, "lsp.servers." .. s)
  if not server_config_ok then
    require("notify")("The LSP '" .. s .. "' does not have a config.", "warn")
  else
    mod.setup(on_attach, capabilities)
  end
end
The module will then use that callback as appropriate by passing it to the specific language server’s setup function.
return {
  setup = function(on_attach, capabilities)
    require("lspconfig").gopls.setup({
      on_attach = on_attach,
      capabilities = capabilities,
      settings = {
        gopls = {
          analyses = {
            fillstruct = false
          }
        }
      }
    })
  end,
}
This approach let’s me keep the LSP configurations nice and modular, while retaining some global settings that are applicable to all of my LSPs.
Debugging
I’ve saved this section for last because it’s in my opinion the hardest to set up.
Like the Language Server Protocol, there is a protocol for debuggers, called the Debugger Adapater Protocol, or DAP. However, there is not widespread adoption among debuggers yet, and some prominent debuggers notably stray from this standard.
The best debugging package that I’ve found for Neovim is nvim-dap, which is a DAP client implementation for Neovim. It lets you set breakpoints directly in your buffers and step through code. Another plugin called nvim-dap-ui provides an elegant UI for nvim-dap, and is basically a requirement if you’re going to be using it. Here’s what it looks like on my machine to debug a JavaScript test.
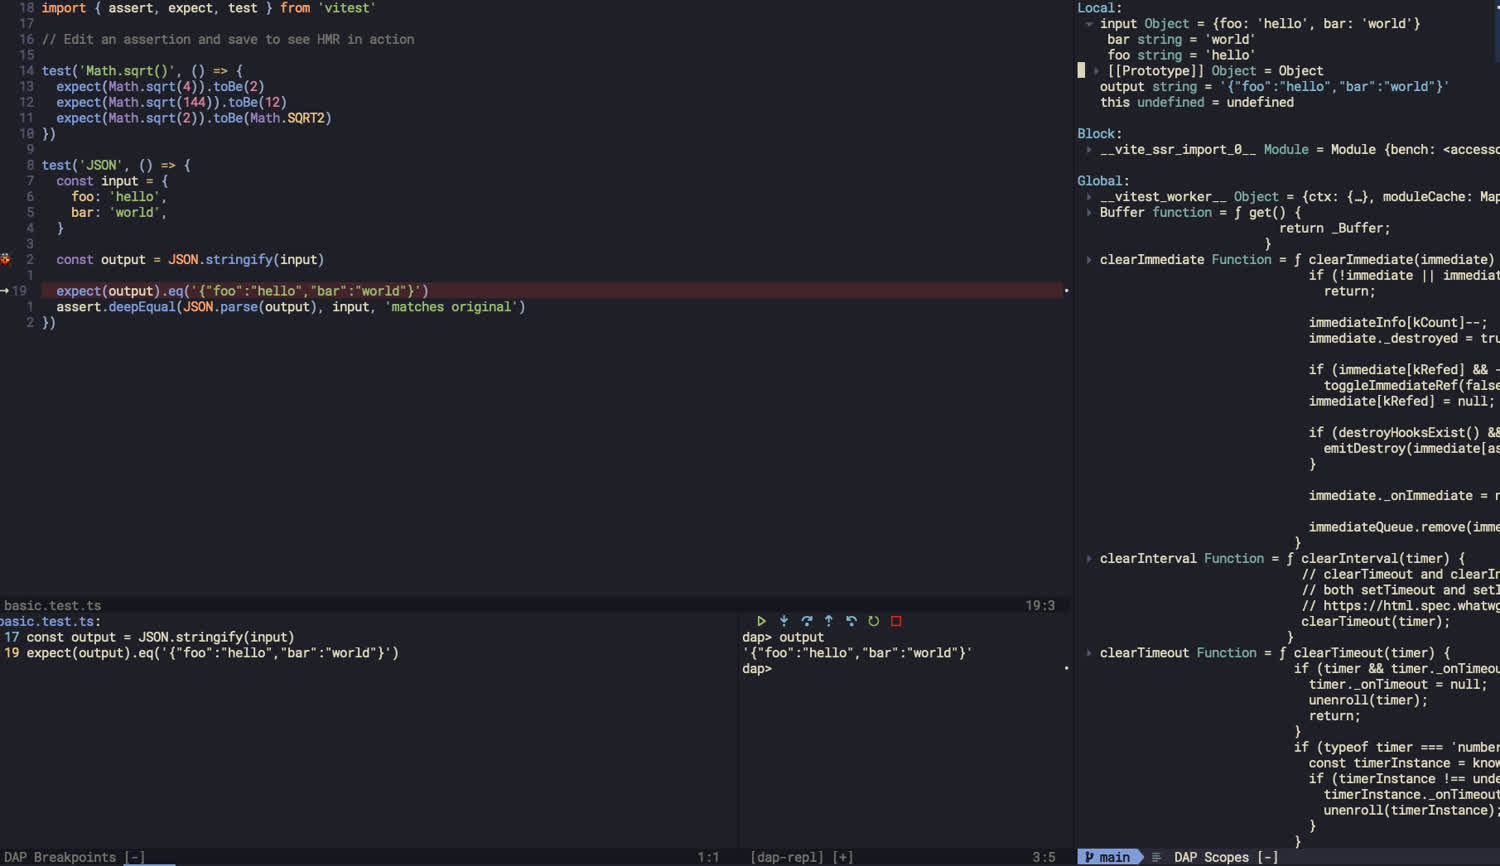
If there’s sufficient interest in it, I’ll make a separate post about setting up a debugger, because it’s quite complicated. But for now, I’ll link again to my dotfiles in the hopes that it helps some people.