


Adding real-time chat functionality can be a great way of spicing up an otherwise vanilla application. Although the underlying technology—websockets—is far from simple, implementing it with SocketIO is surprisingly simple.
This post will walk through the basics of setting up a SocketIO server. We’ll keep the rest of the application very simple—using vanilla Javascript, with no CSS styling. The same principles would apply here for a production-grade application using Webpack and React, however.
The completed project can be downloaded from my S3 bucket.
The project structure
Our project is going to have only a few files. Here’s what the entirety of our structure will be once we’re done:
node_modules/
package.json
index.html
package-lock.json
Readme.md
server.js
client.js
Let’s install our packages first, all we’ll need is socket.io (note the period) and express to run our server. We’re going to install nodemon as well so that our server restarts with every change.
$ npm init -y
$ npm i express socket.io
$ npm i -D nodemon
Then we’ll create our index.html file that we’ll be serving. We’ll require socket.io in a script tag at the top of this file, and we’ll also request the client-side javascript.
<!DOCTYPE html>
<html lang="en">
  <head>
    <title>Socket.IO chat</title>
    <script src="/socket.io/socket.io.js"></script>
  </head>
  <body>
    <form id="form" action="">
      <input id="input" autocomplete="off" /><button>Send</button>
    </form>
    <!-- Only to special -->
    <form id="specialForm" action="">
      <input id="specialInput" autocomplete="off" /><button>
        Send to "special" room
      </button>
    </form>
    <button id="join-special">Join Special Room</button>
    <button id="leave-special">Leave Special Room</button>
    <br />
    <br />
    <button id="disconnect">Disconnect from SocketIO</button>
  </body>
  <script src="./client.js"></script>
</html>
This page is going to render two forms and two buttons. The first form will let users send chat messages to any other users on our application. The second will let users send messages to anyone in the “special” room, which users will have to elect to join. They will join and leave this special room by clicking the “Join Special Room” and “Leave Special Room” buttons, respectively.
The user will also be able to disconnect from our server entirely by clicking the “Disconnect from SocketIO” button.
Let’s create a dummy javascript file for the client, for now. This is the file that is required by the script tag at the bottom of our index page:
console.log("Hello!")Finally, we’ll set our express server next to serve these files.
const express = require("express");
const app = express();
app.get("/", (req, res) => {
  res.sendFile(__dirname + "/index.html");
});

app.get("/client.js", (req, res) => {
  res.sendFile(__dirname + "/client.js");
});

app.listen(3000, () => {
  console.log("listening on *:3000");
});
Let’s start our application. I’m going to be using nodemon.
$ nodemon server.jsVisiting http://localhost:3000 should now server our files, and “Hello!” should appear in the console.
Setting up our SocketIO server
When we use websockets, we need to configure a bare HTTP server. That’s because websockets actually upgrades the user’s connection from the HTTP protocol to the WSS protocol. The WebSocket client will initially send an HTTP request asking for a WebSocket connection, then the server will respond with an HTTP 101 response, to switch protocols. The client can then start to send and receive data in binary format.
That requires us to rewrite our server file slightly. Here’s the edited version. Notice that we’re creating our own HTTP server now; we’re not relying on Express to create the HTTP server for us.
const express = require("express");
const app = express();
const http = require("http");
const server = http.createServer(app);
const { Server } = require("socket.io");

const io = new Server(server);

io.on("connection", (socket) => {
  console.log("A user connected.");
});

app.get("/", (req, res) => {
  res.sendFile(__dirname + "/index.html");
});

app.get("/client.js", (req, res) => {
  res.sendFile(__dirname + "/client.js");
});

server.listen(3000, () => {
  console.log("listening on *:3000");
});
The last thing that we need to do is actually open a websockets connection from our frontend. Remember, because of the order of the script tags in our index file, the socketio library is available as a global variable. If you were using React, you’d have to import this library yourself.
Let’s add the following line to our client file. We pass in as an argument to the io() function the path to our websockets server.
The address of the websockets server is optional at this stage, I’m including it for clarity.
This will make that request for an upgrade to our backend to a WebSockets connection.
console.log("Hello!")
const socket = io("ws://localhost:3000");
Now when we visit our page, we should see “A user connected” in our terminal.
Emitting our first message from the server
Now that we’ve got a client connected to our SocketIO server, we can send and recieve data. This is done in SocketIO with the “emit” method. Let’s write a simple emit from the client that will send back a message to the server.
console.log("Hello!")
const socket = io();
socket.emit("Hello from the client.");
Now, inside of the server file, we need to listen for events. Let’s use the onAny method, which listens for all events. That accepts a callback, which takes the event data as arguments. If we passed multiple strings, they would be picked up in sequence.
The function should be put inside the connection callback, because each socket variable refers to a client’s connection to the server.
const express = require("express");
const app = express();
const http = require("http");
const server = http.createServer(app);
const { Server } = require("socket.io");

const io = new Server(server);

io.on("connection", (socket) => {
  console.log("A user connected.");
  socket.onAny((data) => {
    console.log(data);
  });
});

app.get("/", (req, res) => {
  res.sendFile(__dirname + "/index.html");
});

app.get("/client.js", (req, res) => {
  res.sendFile(__dirname + "/client.js");
});

server.listen(3000, () => {
  console.log("listening on *:3000");
});
If we make a new connection to this server, we should now see “Hello from the client!” appear in our terminal. That’s because our client “emitted” that data, and our server picked it up.
Introducing Namespaces
The way we have structured this code currently doesn’t make a whole lot of sense. The client can emit data back to the server, but the server has no way of distinguishing between messages of different types. What if we had a realtime architecture that needed to segregate administrative and user access, side by side? We need a way to tell different data streams apart.
This is where “namespaces” come into play. Namespaces let us use different event handlers for different kinds of namespaces, so that our logic is divided within our application. Clients will be connected to the / namespace (the default namespace) if they don’t specify one initially.
Since we’re creating a “chat” application, it makes sense to create a chat namespace. Let’s modify our client code, so that the user only emits this data to the “chat” namespace.
Next, let’s emit a “message” event. On the server, we can now listen for the “message” event and respond accordingly, rather than responding to any event. Our code is now a bit more semantic.
console.log("Hello!")
const socket = io("ws://localhost:3000/chat");
socket.emit("message", "Hello from the client.");
Rather than responding to all events in our “chat” namespace, let’s only handle “message” events for now.
const express = require("express");
const app = express();
const http = require("http");
const server = http.createServer(app);
const { Server } = require("socket.io");

const io = new Server(server);

io.on("connection", (socket) => {
  console.log("A user connected.");
  socket.on("message", (data) => {
    console.log(data);
  });
});

app.get("/", (req, res) => {
  res.sendFile(__dirname + "/index.html");
});

app.get("/client.js", (req, res) => {
  res.sendFile(__dirname + "/client.js");
});

server.listen(3000, () => {
  console.log("listening on *:3000");
});
We should now still see the chat coming from the client. The difference here is that our client emitted a “message” event specically to the “chat” namespace.
Wiring up event listeners
Let’s wire up the rest of our frontend. We’ll scrap the code we just wrote (it was only for explanation purposes). Instead, we’ll be emitting various events to our backend, depending on what action occurs. Those events will ocur on button clicks and form submissions.
const socket = io('ws://localhost:3000/chat');

const form = document.getElementById('form');
const input = document.getElementById('input');
form.addEventListener('submit', function (e) {
  e.preventDefault();
  if (input.value) {
    socket.emit('message', input.value);
    input.value = '';
  }
});

const disconnect = document.getElementById('disconnect');
disconnect.addEventListener('click', () => {
  socket.disconnect();
});

// Log messages from other users on the "chat" namespace.
socket.on('chat', (data) => {
  console.log(data);
});
When the form is submitted, the user (who is connected to the “chat” namespace) will emit a “message” that will contain the form’s contents. We’ll then clear the form.
On the backend, we can listen for the “message” event and respond by re-emitting the message out to anyone inside of the “chat” namespace. The socket.broadcast.emit() method lets us send the message out to everyone except for the user who initially sent it.
const express = require("express");
const app = express();
const http = require("http");
const server = http.createServer(app);
const { Server } = require("socket.io");

const io = new Server(server);

io.on("connection", (socket) => {
  console.log("A user connected.");
  socket.on('message', (message) => {
    socket.broadcast.emit('chat', message);
  });
});

app.get("/", (req, res) => {
  res.sendFile(__dirname + "/index.html");
});

app.get("/client.js", (req, res) => {
  res.sendFile(__dirname + "/client.js");
});

server.listen(3000, () => {
  console.log("listening on *:3000");
});
If we open up two browsers to our application, we should be able to send messages back and forth between them. Those messages will get displayed in the console.
Here’s the full flow of events.
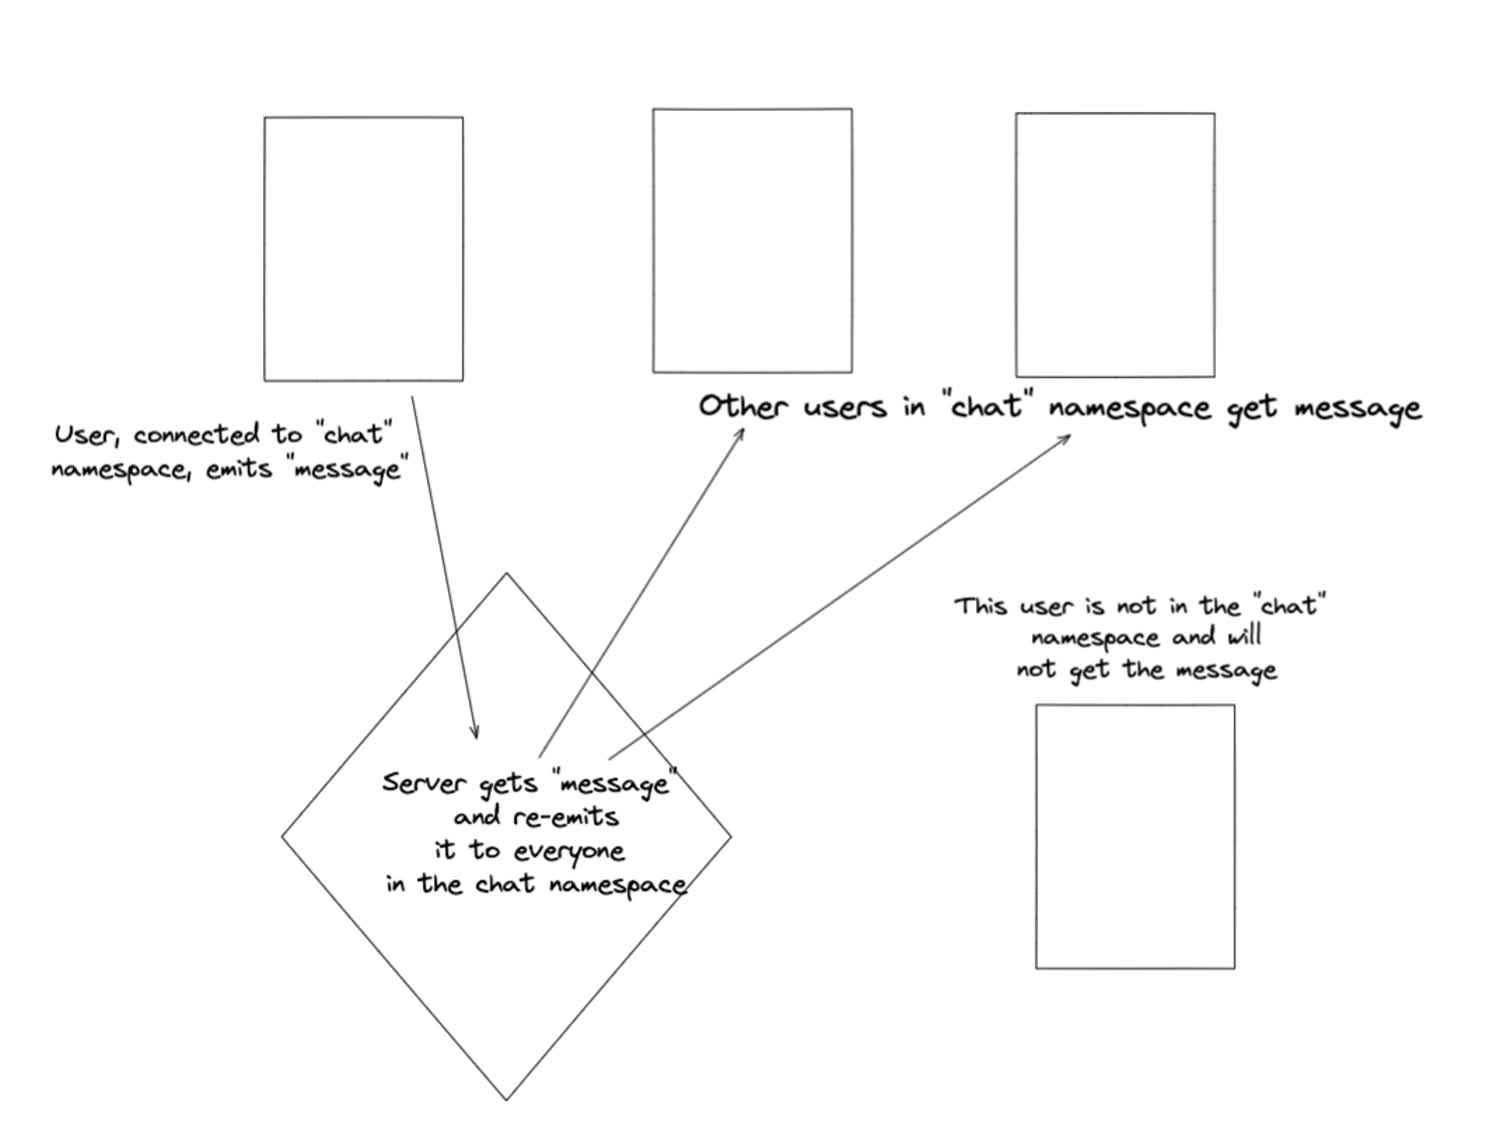
Data flow between SocketIO clients and the server
As you can see in the diagram, we could in theory push this data out to many different users of our application. This is what makes Websockets so powerful: rather than forcing the client to long-poll our server to get the latest up-to-date information, we can “push” that data out from the server.
Adding Rooms
What if we wanted further separation between our users? For instance, what if we wanted users to be able to join specific rooms after joining our application—a common use case for a chatroom—in order to get messages? We can accomplish this with SocketIO’s “rooms” functionality.
Rooms are a server only construct. A client will not actually know what “rooms” they have joined. All of the work of joining a socket to a room and leaving a room is done on the server.
Let’s make a “special” room on our server, so that only people who are in the special room can recieve special messages. We can accomplish this by responding to a specific event from the “chat” namespace. When that event comes in, we can join a user to the room.
First, let’s add a button to the frontend that will emit a “join” event to the backend, and pass it the name of the room we want to join. We can also wire up another button to leave the room.
const socket = io('ws://localhost:3000/chat');

const form = document.getElementById('form');
const input = document.getElementById('input');
form.addEventListener('submit', function (e) {
  e.preventDefault();
  if (input.value) {
    socket.emit('message', input.value);
    input.value = '';
  }
});

const disconnect = document.getElementById('disconnect');
disconnect.addEventListener('click', () => {
  socket.disconnect();
});

socket.on('chat', (data) => {
  console.log(data);
});

// A user can click on this button to join the "special" room.
const joinSpecial = document.getElementById('join-special');
joinSpecial.addEventListener('click', () => {
  socket.emit('join', 'special');
});

// Leave the special room
const leaveSpecial = document.getElementById('leave-special');
leaveSpecial.addEventListener('click', () => {
  socket.emit('leave', 'special');
});
Now, we can handle the “join” and “leave” events on the backend. Let’s add that now.
const express = require("express");
const app = express();
const http = require("http");
const server = http.createServer(app);
const { Server } = require("socket.io");

const io = new Server(server);

io.on("connection", (socket) => {
  console.log("A user connected.");
  socket.on('message', (message) => {
    socket.broadcast.emit('chat', message);
  });

  socket.on('join', async (room) => {
    socket.join(room);
    socket.emit('chat', `Joined '${room}' room!`);
  });

  socket.on('leave', async (room) => {
    socket.leave(room);
    socket.emit('chat', `Left '${room}' room!`);
  });

});

app.get("/", (req, res) => {
  res.sendFile(__dirname + "/index.html");
});

app.get("/client.js", (req, res) => {
  res.sendFile(__dirname + "/client.js");
});

server.listen(3000, () => {
  console.log("listening on *:3000");
});
This code will join the user to the room that is specified in the event. Now, on the frontend, users can emit a “join” and pass it the name they want to join.
If you look at our index.html file, you’ll notice that we have a form for the special room. Let’s wire up the frontend so that the form submits a special-message to the backend.
const socket = io('ws://localhost:3000/chat');

const form = document.getElementById('form');
const input = document.getElementById('input');
form.addEventListener('submit', function (e) {
  e.preventDefault();
  if (input.value) {
    socket.emit('message', input.value);
    input.value = '';
  }
});

const disconnect = document.getElementById('disconnect');
disconnect.addEventListener('click', () => {
  socket.disconnect();
});

socket.on('chat', (data) => {
  console.log(data);
});

const joinSpecial = document.getElementById('join-special');
joinSpecial.addEventListener('click', () => {
  socket.emit('join', 'special');
});

const leaveSpecial = document.getElementById('leave-special');
leaveSpecial.addEventListener('click', () => {
  socket.emit('leave', 'special');
});

// This form only emits to the special room. Users must join that room to recieve the messages.
const specialForm = document.getElementById('specialForm');
const specialInput = document.getElementById('specialInput');
specialForm.addEventListener('submit', function (e) {
  e.preventDefault();
  if (specialInput.value) {
    socket.emit('special-message', specialInput.value);
    specialInput.value = '';
  }
});
Now, on the backend, we will listen for the special-message and we will re-emit the data to anyone who has joined the special room.
const express = require("express");
const app = express();
const http = require("http");
const server = http.createServer(app);
const { Server } = require("socket.io");

const io = new Server(server);

io.on("connection", (socket) => {
  console.log("A user connected.");
  socket.on('message', (message) => {
    socket.broadcast.emit('chat', message);
  });

  socket.on('join', async (room) => {
    socket.join(room);
    socket.emit('chat', `Joined '${room}' room!`);
  });

  socket.on('leave', async (room) => {
    socket.leave(room);
    socket.emit('chat', `Left '${room}' room!`);
  });

  socket.on('special-message', (message) => {
    socket.to('special').emit('chat', message);
  });

});

app.get("/", (req, res) => {
  res.sendFile(__dirname + "/index.html");
});

app.get("/client.js", (req, res) => {
  res.sendFile(__dirname + "/client.js");
});

server.listen(3000, () => {
  console.log("listening on *:3000");
});
Notice the syntax here: The socket.to() method accepts the room name as it’s sole argument, and then emits a “chat” message to that room. It passes back in the message from the original sender. Any of the users who have joined the special room will then recieve that message.
Next Steps
This is obviously a very simple implementation, and doesn’t use any frontend framework—like React, Vue, Svelte, or whatever the hot new framework is. If you were using React, for instance, you could set the state each time a message came into the client. We merely logged the messages in this example.
Hopefully this gives you an idea of what’s possible in SocketIO, and will allow you to implement it in your own projects in the future!